Discovering a Monarch Chrysalis on Rosemary

It is not usual to see a Monarch caterpillar on a Rosemary plant. Monarchs like Milkweed. But this one had a purpose, and had traveled quite a long way to be there.

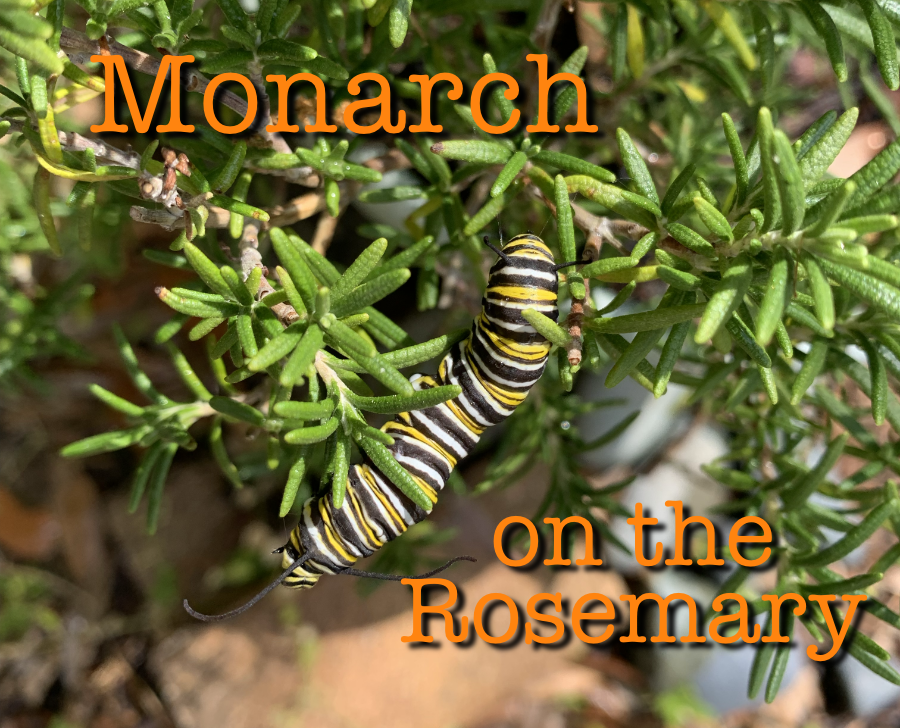
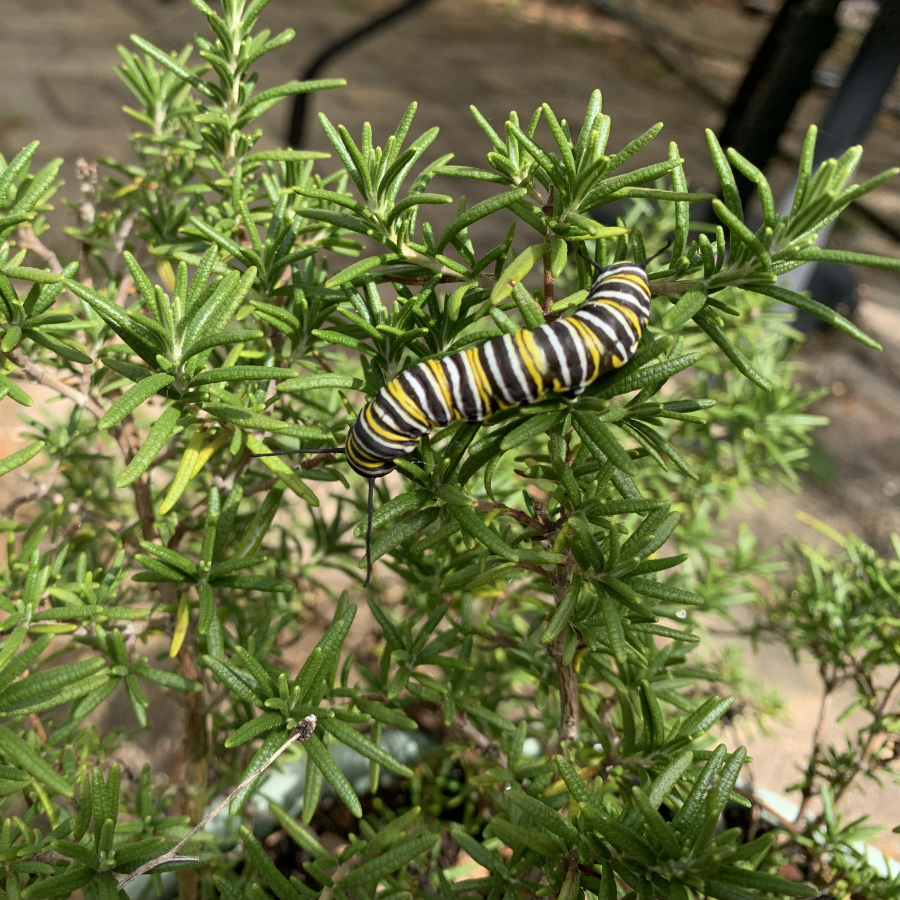
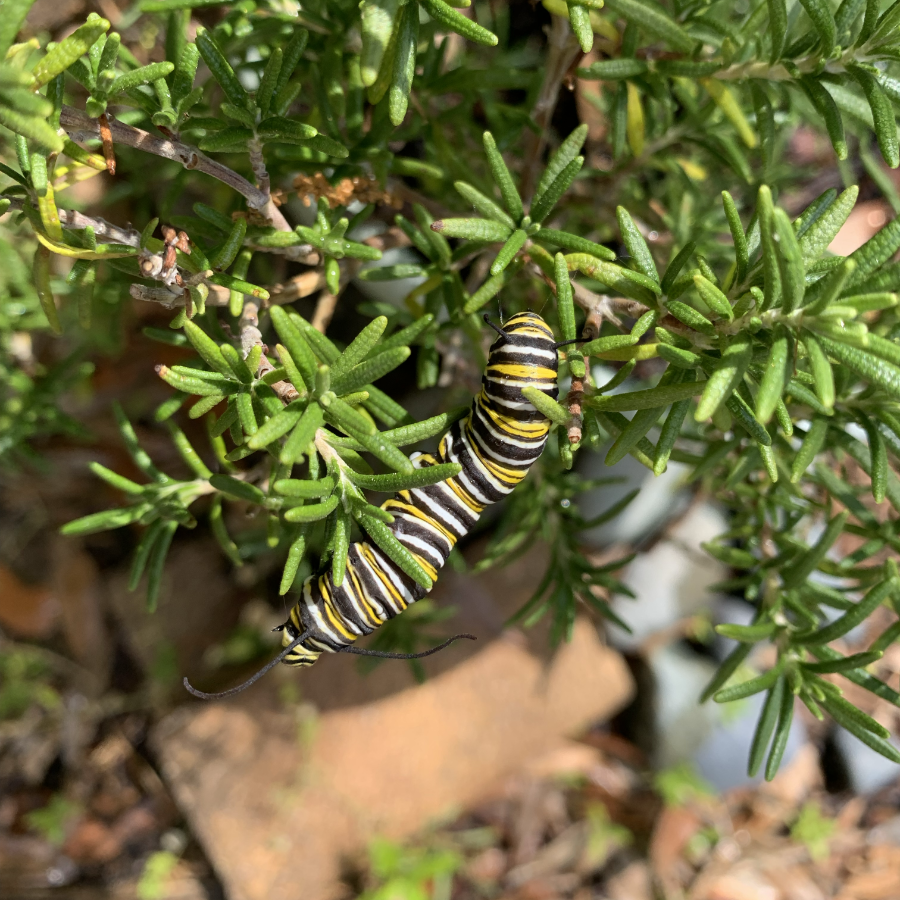
I have one Rosemary plant in a pot on my back deck. On March 24th I noticed this caterpillar climbing all over it. I recognized it as a Monarch caterpillar and wondered what it was doing on the rosemary.

My first thought was, “You poor thing, you must be lost.” I know he needed milkweed to eat. But, I also know that some caterpillars crawl away from the host plant to create their pupa. I left him alone, and didn’t see him the next day. I figured the birds got him.

I worry about cardinals eating the caterpillars, but I guess birds don’t like the taste. I do see lots of caterpillars, and then they disappear. I always figure something ate them.

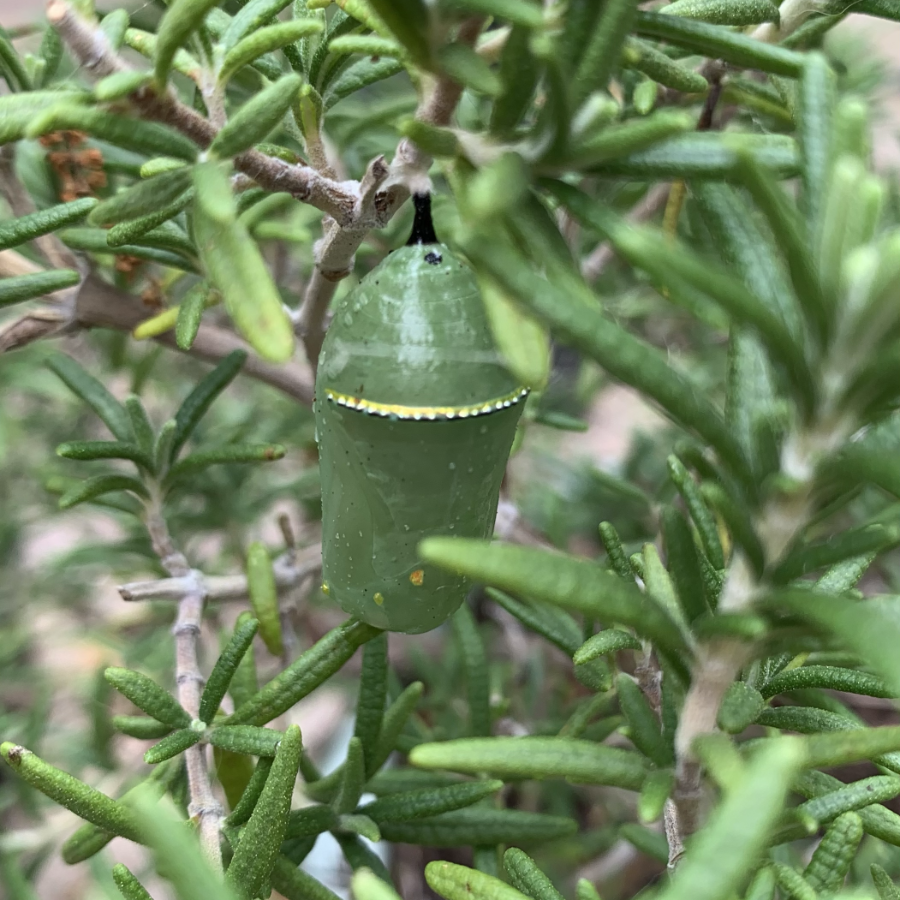
A day or two later I was at the Rosemary plant to cut a piece for my tea. And there it was. A beautiful green chrysalis! It had what looked like a gold band near the top and little gold specks. The caterpillar chose a spot down under a branch, which makes it difficult to see. The caterpillar had not disappeared. He, or she, had morphed and was no longer a caterpillar.

Although I do have some milkweed in my yard, it is pretty far away from the rosemary. It is a long way for a caterpillar to crawl!

I had to look this up. One notation mentioned they will crawl as far as 30 feet from the host milkweed! I don’t know how this little guy made it to the rosemary. My best guess is that it is 20 to 30 feet, from my milkweed.

The day after I found the chrysalis, we had a huge, windy rain storm. The wind blew hard, from all directions and I was a bit worried. The attachment was good and the chrysalis remained.

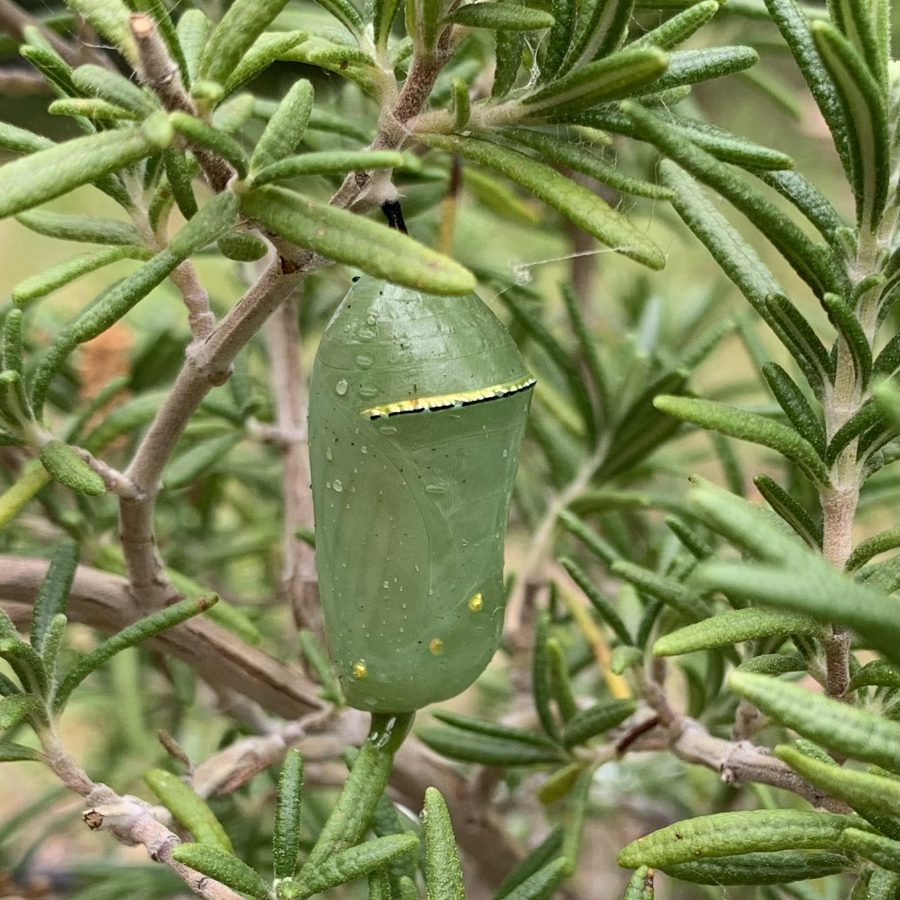
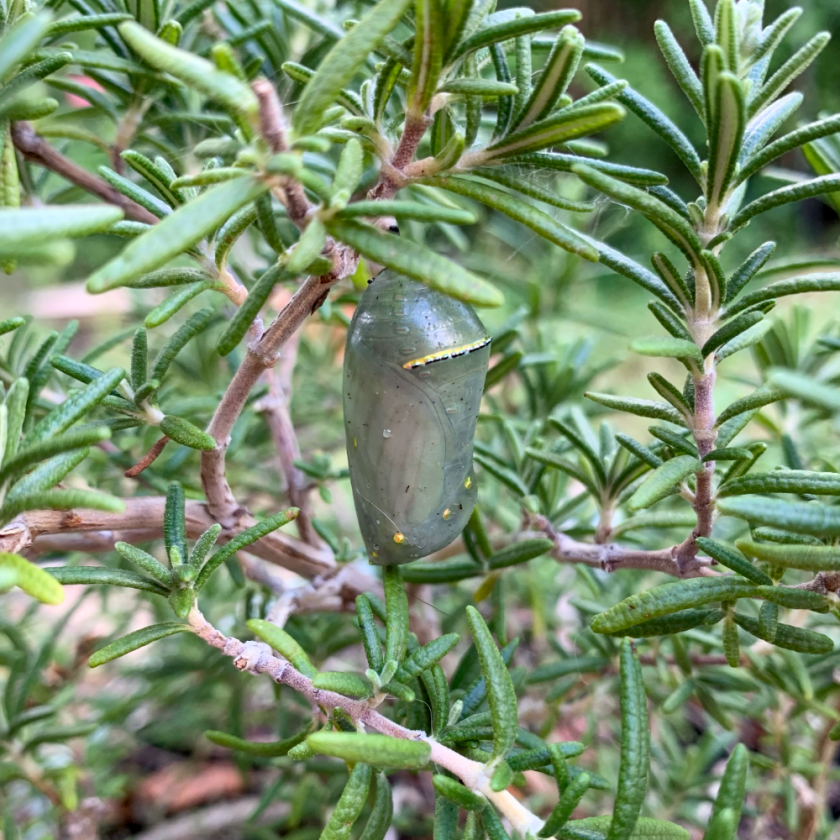
Today is April 5th and the chrysalis is darker in color (see photo below). I can see a wing inside! It has been 11 days since I saw the caterpillar. The Life Cycle, Monarch Joint Venture page says this stage can last 8-15 days.

I should expect to see a butterfly soon!

monarch chrysalis is getting darker
Can you see the wing?

Even if I miss the butterfly emerging, I’m happy to have had this chrysalis in my garden. I might get more rosemary and put it nearer the milkweed. The sturdy branches might be what drew him all this way. It makes me wonder if the caterpillar somehow knew the rosemary was here and purposefully headed to it.

I’ll be watching this one closely.

*Update – The next day…

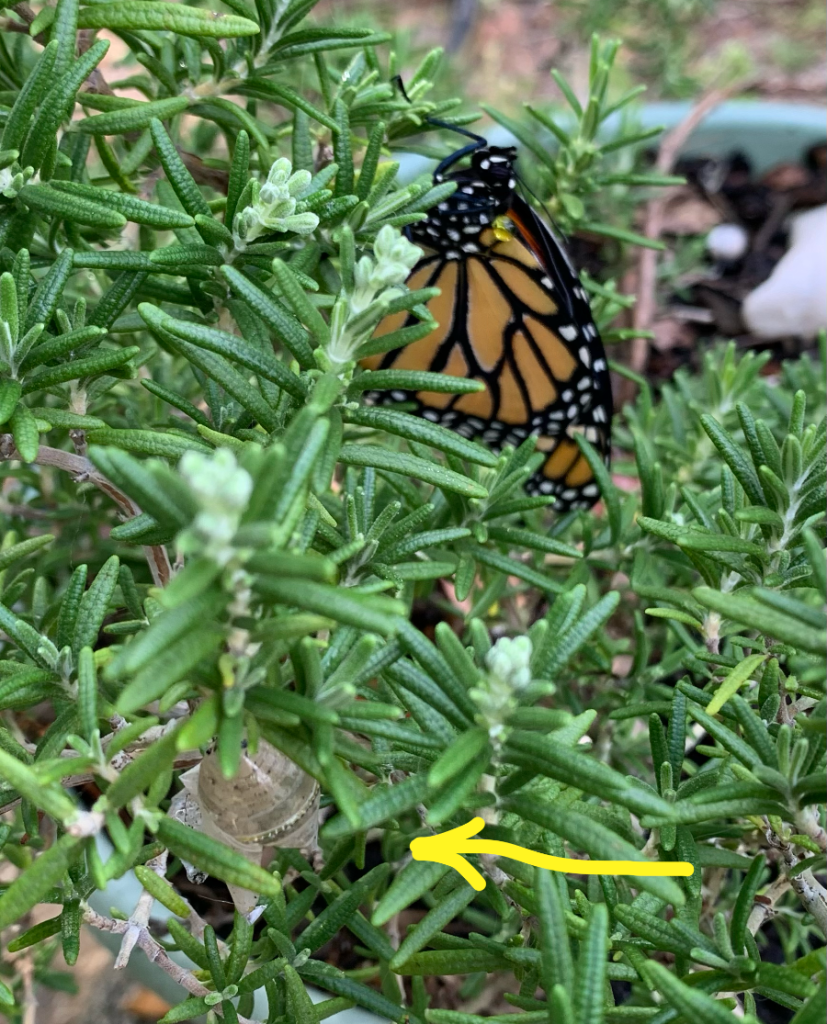
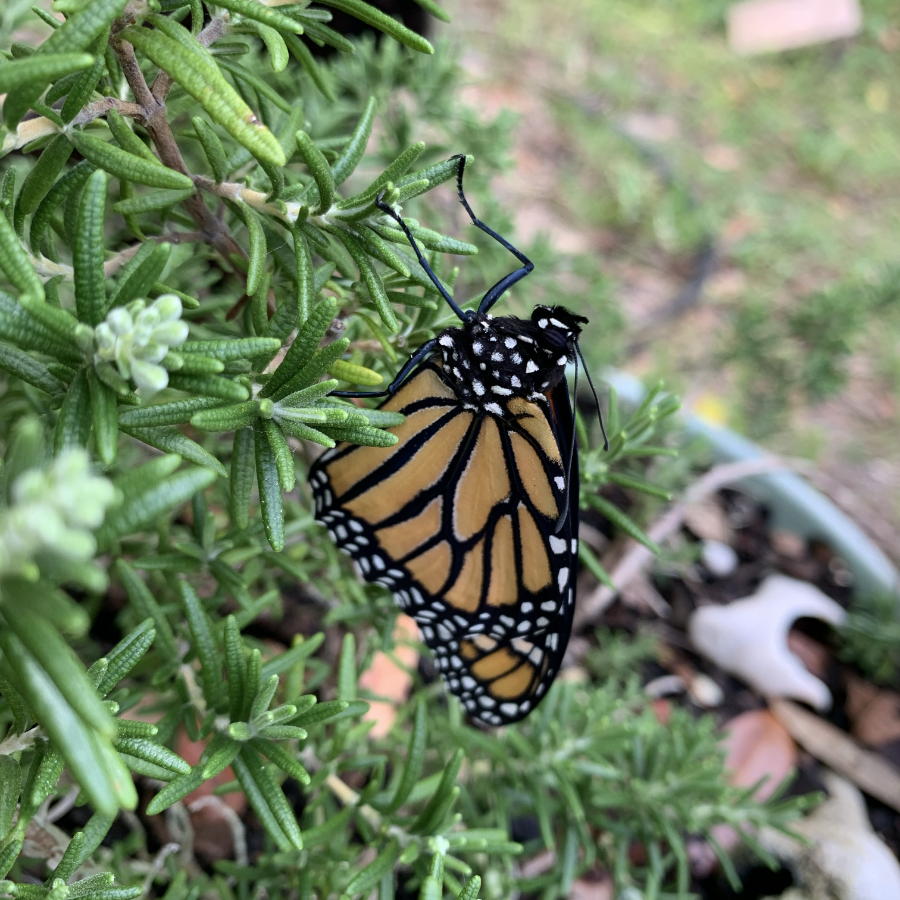
The chrysalis was very dark the next morning. I had some vegetable plant watering to do, but finally went to get my iPhone for a picture. I was too late! The butterfly was already out and on the Rosemary.

If you see a very dark colored chrysalis, sit and watch! It wasn’t long at all. I’m sorry I missed his emergence, but I got to see him before he flew away.

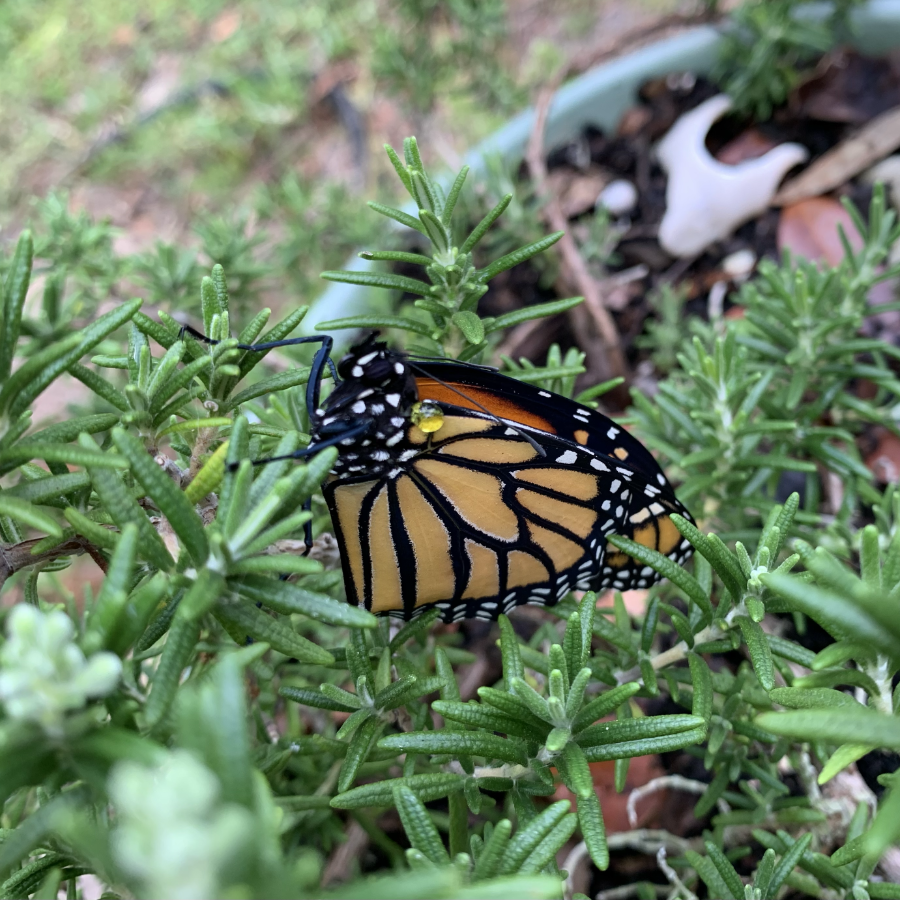
In fact he has been sitting on the plant for hours now.

Freshly hatched, Monarch butterfly near open chrysalis.
butterfly divider flowers

Something went wrong. Please refresh the page and/or try again.

How to Grow a Flowering Hedge in Five Years

Propagated cuttings created this flowering hedge in my front yard.

Here is the simple way I grew a bushy hedge full of flowers. I did it in five years time.

Actually, I did very little. I took cuttings from the tall shrubs in my backyard. When they rooted in water, I put them into pots. They kept growing. Once they were large enough, I planted them in the front lawn. I gave each shrub plenty of space.

I had considered putting a few bottlebrush trees between them, but it never happened.

The Premna Serratifolia is Quite Awesome

I had no idea what this shrub was until I researched it for this blog post. The Premna Serratifolia is fast growing and blooms profusely in March and April where I live, but only for a short time. The leaves supposedly have health benefits and are edible.

At the time I am writing this page (April 2), The blooms are already going by. The clusters of tiny white flowers smell wonderful, and attract all kinds of beneficials.

If I were a better photographer, I could show you the bee variety and even a few Monarch butterflies that were all around those flowers. This shrub is loved by the pollinators.

When we bought our house in 2016, the land across from us was wild. Once it went up for sale, I realized that we could have neighbors soon. That’s when I took cuttings from the shrubs in the back. I had no idea if I could root them.

It turned out that this plant is very easy to propagate. Every cutting grew roots in water and then grew nicely in a pot. After a few weeks I ended up with five new plants.

The big mistake many people make when planting crops and new trees and shrubs is that they put them too close together. I gave these little cuttings a lot of room. The roots would not have to compete for water and nutrients.

Below is a photo of the old plants behind our house. As you can see they are very tall. A lot of vines have taken over too. Typical of Florida.

The flowers are now falling like snow from the tall shrubs.

Old plants

The “baby plants” are now taller than I am. I’m guessing they have reached 8-10 feet – in five years time. I think that is pretty fast growth.

The plants outback were probably planted when the house was built.

So now we have new neighbors where a Florida forest used to be. Three new houses went up, and every bit of vegetation was removed. Perfectly beautiful oak trees, pines and other things were torn up and removed. This is just one reason I dislike living here. Why not leave the trees that are not in the way of where the new house will go? Builders don’t care – just make it easy and remove everything.

My new, and free, hedgerow is growing up nicely and blocking the view. I also love that I’ve provided food and nectar for the insects. A living border also provides places for birds and other wildlife to hide.

I’m not sure if this shrub is available in local nurseries, but I think it makes a very nice addition to the yard. The Premna serratifolia is not a Florida native.

More stories…

February Garden Planting

It is the end of February and here in Florida I am getting some seedlings and sweet potato slips into the raised beds.

Finally I have filled my long raised bed. This took some real effort. The metal bed is from Vegega and is 17 inches high. It had 12 pieces to assemble and it was a hot day. It actually took me 2 days to put it together, and then it was time to fill. That took many days and a couple of trips to the Yard Shop.

The last push to fill it took 8 bags of purchased soil. I also mixed in some perlite, compost, and fertilizer. At last it was full.

I’ve had some sweet potato slips growing on my windowsill for a few weeks. I kept finding sweet potatoes buried in the yard that were rooting. They really needed to get into the ground. Our weather is not super hot yet, but I figure the plants are better off in dirt than in water in my house. Also, we have an upcoming camping trip. The goal is to plant things before I leave.

Originally, I had planned to order some sweet potato slips. When companies send out the slips, they do not specify when they will come. We have a couple of camping trips coming up and I’m afraid I will not be home when the slips arrive. Also, I found so many potatoes in my yard that were already growing, that I don’t really have room to plant more.

I have one more raised bed to set up. It could take me a while. I’m feeling good that this one is planted and hopefully I will have sweet potatoes to eat in a few months.

Peppers and Eggplant

Both pots of peppers were doing nicely. I have not tried to grow either type before. I planted the seeds for the Sweet Banana and Ubatuba months ago. The seedlings were thinned to 2 in each pot. Have you ever heard that peppers like to touch each other? I remembered this so I left 2 together. I’ve always had a very hard time getting peppers to grow, so I don’t have high hopes for these.

Now they are safely planted into the round metal bed. I had to set up my umbrella because it was very hot and sunny. I’ll let them have sun all day once they are adjusted to their new grow space, or if it cools off a bit. They will definitely need this shade every afternoon during summer.

In Hindsight

I’ve written about growing peppers often. Last year I had many plants that looked great for a while and then suddenly died. One had waterlogged roots, so I knew the cause of that. It made me empty my grow boxes and drill holes for drainage.

The other pepper plants were in fabric bags. I think there is a problem with these bags. First, I moved the plants from one area to another. I suspect the roots were damaged when I did that. Also, fabric bags dry out fast. I’m learning this from emptying them now. Even though I water like mad, there is lots of dry soil in every bag. I plan to write more about this.

Happy gardening! … to those who are lucky enough to be able to do it in February.

garden vegetables divider
Thanks for reading!

Setting Up My Second Metal Raised Garden Bed

My new, long raised bed came from the Vegega company. It is 17 inches high and 8 feet long. This one has been a challenge to set up.

Today, and for days after, I have spent time putting together my Vegega raised garden bed. This is a metal, raised bed that is a long, skinny shape. The size is 8 feet long by 2 feet wide, and 17 inches high.

A while ago I bought a round bed and it was fairly easy and quick to put together. This new, larger bed was not nearly as easy. Having help, or better yet someone young, or a husband, to do it for you, would be ideal!

Vegega long garden bed made of metal.
Pieces of the Vegega are up and loosely screwed together.

The round one went together fast. I did one half of the circle at a time, in the house. Then I assembled the two halves outside. I think I did it all in one day. The long bed took more effort because of it’s size and shape.

What is left to do? There are bars, to act as supports for the sides, that need to be placed. The directions are not great, but it appears they hook over the screws. – Nope, they take the place of the screws. A rubber edging needs to be applied all the way around to shield from sharp edges. I need to make sure it is fairly level, and then begin the filling.

The Beginning

I want my beds ready to plant by March. Time is passing. Not only do they (I have two) have to be set up and filled with dirt, there is prep work.

Each piece is coated. This bed has 12 pieces and the plastic coating needs to be removed from all of them. I did sit on the floor to peel all that coating off. This is almost the worst part. It comes off in one piece nicely, but there is lots of tugging to be done.

It took me 2 partial days to set up this bed, tighten the screws and add the two braces needed for this size. I did a few sections inside the house. I carried the sections out and attached them as I went.

A few days later I added the support bars – of which there are no directions, except where to place them (image). They take the place of the nuts in two sections. After that, I tightened all the 1,000 screws. Just kidding, but seemed like it. The day was quite hot, and my new Vegega is directly in the sun.

It took 7 minutes to put the black edging on (yup I timed it), and there was plenty of it with a bit leftover.

I feel like the round Vegega was a LOT easier to do. It’s smaller, was easier to set up and quicker to finish. I kept waiting for a good sale, but they never had one. Each bed is a different shape. The next one is 4×6 I think. Hopefully it is easy.

Screwing it together took a lot of bending over. I don’t have a real problem bending, but the angle to tighten the screws was awkward. Also, did I mention? It was hot.

Filling The Raised Bed

I’ve found that the easiest, and cheapest, way to fill a raised bed for planting is to use a variety of things. I want this bed ready to plant by March. I only have a few weeks.

Cardboard boxes are something I save. They have been building up on my porch all summer. It is so hot that we don’t use the porch for much except storage, until the few winter months.

Cardboard works well to level the bed and fill the bottom. It is not there to keep weeds out! Weeds grow from the top, not 17 inches upward from the bottom. It amazes me that everyone puts black plastic under their beds to keep the weeds out! I like something compostable incase whatever I grow needs more root space beyond the depth of the bed. I didn’t do anything to the ground beneath the bed.

Next I added some paper filler that came in some deliveries. On top of that I added pine straw. The local Yard Shop only sells this and not regular straw. It will be flattened once the dirt is added. Pine is acidic, but it will be way down in the bottom and will eventually decompose.

Cuttings from old vegetables, flowers, and shrubs are added next (nothing diseased). Sometimes I have dirt from a box or pot to throw in. I’ll be buying and adding more new dirt, along with fertilizer and homemade compost. I’ll mix the cuttings with all the other dirt to fill this bed. Some Perlite will be added to keep the dirt loose.

Vegega metal raised garden bed

All of this will compost over time. It will break down and become part of the bottom layer of soil.

Mid-February: Still adding dirt, compost and cuttings to this bed. It’s taking a lot to get this thing filled. I still have to buy more dirt. In the end, I will have a nice, big bed for planting.

metal raised bed being filled with dirt

This metal bed is 17 inches tall, so most of what I grow in it will not have roots that deep.

Ideas For Planting in This Raised Bed

I have one idea for summer planting in this new raised bed. I will grow sweet potatoes. Maybe some Holy Basil plants will work next to the edge. Not much else grows in summer. At least nothing I would plant in this bed.

sweet potato sprouts

Next winter I will use this new bed for planting broccoli, onions, and carrots.

Keep Reading

Borage Season is Here

Florida gardeners can easily grow borage. The blue flowers add interest to any garden, and honey bees love them. The plant is short lived as it dislikes the heat.

One of the things I love about a Florida winter is that the Borage will grow. Borage is a fuzzy-leafed, blue-flowering plant. Its leaves make a delicious tea. The little flowers are blue, or sometimes pink, and star-shaped. They can be used in salads and ice cubes.

Saved borage seeds, from last winter, were planted in the yard this Fall. The borage really began to take off in January. Now, in February, it is getting leafy and some of the plants are showing off lots of flowers. The flowers attract honey bees.

(All photos on this page are my own and are not free to use.)

Borage likes the cool weather. It wilts in the sun on hot days. Soon I will be collecting some seeds from the early flowering plants.

At this time of year it can be cold or hot. We had a very cold January, but February has been very warm with temps near 80 during the day (in the sun).

I have been picking, rinsing and drying borage leaves to freeze. The plants won’t last once the weather is consistently hot.

cabbage and borage

Borage can be grown among vegetables to keep unwanted pests away. The leaves are very hairy and prickly.

honey bees on borage flowers
Three bees visiting a flowering borage plant.

Borage is a medicinal herb (read more here). I pick the leaves fresh and make tea. The seeds are rather large and are easy to save, if they can be found before dropping from the pod.


The bees are also on the newly flowering red Lantana. I planted this red one and two others (yellow and dark red) last year. This is the only one doing well. The Lantana will still grow and bloom in the heat. When the Borage has gone by, the bees will have other flowers to visit.

More Garden Stories

My newer posts are from my Florida gardening experiences. Any stories with snow were created when I lived in New Hampshire.

Final Word on Growing Daikon Radish

I’m done growing the Daikon radish. It grew so well in my garden over the winter, but I just can’t handle the taste.

When Fall arrived, I planted some daikon radish seeds. They began to grow right away. After a while, I planted more. I was really hoping I would like them. I tried. I don’t. This is my final word on this vegetable.

They are milder than a regular, small red radish. But they are still radishes. I tried numerous times to eat them in salad, or as a slaw mixed with carrots and sugar.

I would mix up the grated carrots, Daikon, sugar and oil, then let it sit for a while. This slaw mix ended up being okay mixed with greens as a salad. But not great. Honestly, it wasn’t worth my time and effort.

Now it is almost February. This means Spring planting is right around the corner. It was time to pull up the Daikons to make space for something more edible.

Growing Daikon Radish in Zone 9B

I had great luck growing the Daikon radish in my garden. The first seeds were planted September first. It is still very hot here and they grew. I planted another variety in October. Both types seemed to taste exactly the same, but the Miyashige White grew bigger. I bought the seeds at Annie’s Heirloom Seeds.

Some plants were a bit close together, but I don’t have a lot of space. They grew without any problems, through heat in early Fall, and cold, drought, and rain in January. Figures. All the foods I DON’T LIKE grow super well here. (Okra is on my mind.)

Many radishes became quite large, but others were still small when I pulled them. It is amusing how they push upward out of the dirt.

It might be a fun crop for kids to grow. Be aware that the leaves are a little bit prickly.

I began a new compost pile with all the radishes I wouldn’t be eating. Nothing goes to waste. These will break down and provide rich soil to put back into the garden.

I think that the only thing I can say about growing these big radishes is that they help to break up the soil. The roots are very long. Because they are so large, with bunches of greenery, they add goodness to compost. It’s not a good reason to grow them, so I am done.

vegetables divider separator