The Year The Tomatoes Died

tomato blight
Tomato Blight Disease

I hate to even write about this, but it’s the unfortunate story of tomato death. This depressed me so badly that at one time over the summer I decided I would never grow tomatoes again. But of course I will. I don’t give up that easily!

I don’t plant many tomato plants because I don’t have the space. I don’t eat that many tomatoes either, but I do look forward to picking my fresh, garden crop by August. I look forward to it all summer long, from the time the little tomato seedlings are put into the ground. At one time I counted 30 tomatoes on one plant, and I had 6 plants, so I expected a nice crop.

green tomatoes on the vine
When They Looked Good

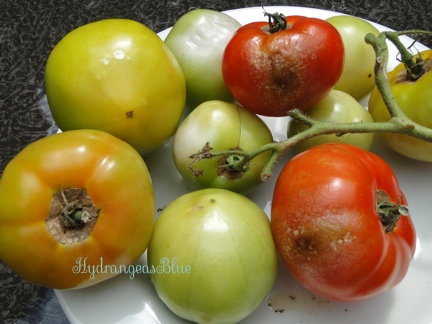
It wasn’t meant to be. In the past I’ve never had a problem with my tomatoes growing nice and big and ripe. The “Celebrity” variety is my favorite, so I grow them.  I water them when it’s dry and I rotate my planting space. I give them fertilizer and watch for bugs and tomato worms. Everything was fine. Until it wasn’t. Suddenly, it seemed like overnight, I noticed that the leaves were looking funny. They were brown and wilting. They were curling up and dying near the bottom of the plants. I had managed to pick and eat a few of the early ripe fruits, but the others ended up looking like my first picture, above.  With brown spots and weird looking markings and colors, they were inedible.

red, ripe garden tomatoes
Garden Tomatoes

There is always next year. It seems so far away.

Pinky Winky Blooming Timeline

All season I have been photographing my beautiful Pinky Winky hydrangea shrub. Now I am ready to share my pictures, in a blooming timeline, to show the progression of the flower color from spring (summer) through fall.

The bush is lopsided because the deer decided that the buds would be a tasty treat (darn deer), but at least they left me some flowering stems.

So here you have the white to pink progression, with a surprise late white flower showing in my last photo. After all the blooms had turned totally dark pink, a lone white bloom appeared. It looks so pretty against the rest of the bush, that I made a hydrangea poster from the image to sell in my BlueHyd store.

If you are unfamiliar with this variety, the flowers begin as all white, then gradually become pink from the bottom up. As time goes on the pink darkens to a beautiful shade, which can be seen in my last image here.

budding hydrangea shrub
The Buds in July
white flowers hydrangea
White Flowers – side branches were chewed by Deer!
white flowers with pink
Some Pink Beginning to Show
pink hydrangea paniculata
Most flowers are pink by late summer
hydrangea flowers white pink
Sept: All flowers are dark pink except for one new white bloom

I don’t have the exact dates listed, these photos were taken from the end of July through September. The hydrangeas don’t really start to grow flowers in my area (southwestern New Hampshire) until summer. The pinky winky is a fun one to watch as it changes throughout the season. This bush also attracts a lot of bees. So along with being a beautiful ornamental for the yard, I am helping to feed the wildlife – deer and bees! I don’t mind the bees, but those deer have plenty to eat without ruining my hydrangeas.

Recent Blog Posts

Hydrangea Trees and The End of Summer

hydrangea treeI’ve been enjoying the big hydrangea trees that I see blooming in my neighborhood. How lovely it would be to have a big tree with these lovely blooms! For one thing, hydrangea flowers last a long time, so the tree would look beautiful all summer and into fall.

None of my hydrangea shrubs are very large yet, and this year the blue one did not bloom well. I have only one blue flower, which is disappointing. But the only hydrangea in my yard that will become a small tree is the Pinky Winky.

Certain hydrangeas can be trimmed to become trees. The Limelight can be purchased as a tree, so obviously you could trim it to become one.

My Limelight bushes had long stems and I was experimenting with ways to get them to grow more compactly, but then I moved away.   I planted a Limelight hydrangea on each side of my front steps, and they really needed to be in a place with more space to grow.  Their long lanky stems may have been caused from lack of sun, although they did get sun, but not all day.

flowering limelight hydrangea
Limelight Hydrangea – August 20th, 2014

One of my favorite hydrangeas is the Pee Gee (Paniculata grandiflora – PG). I bought one but it died (photo below), due to my poor choice of planting location. I never had a chance to get another one while I lived in New Hampshire and now in Florida, they won’t survive.

The Pee Gee has beautiful white flowers and can be trained into a tree by choosing one main stem, or possibly two, and removing the others. This is the basic way to train a shrub into a tree. Spring is the best time to do this, as the shrub will be ready to take off and grow. Pee Gee’s bloom on new wood, so all new growth in Spring has the potential to produce flowers. For that reason, never trim late in the season when flower heads could be removed.

The website The Spruce has more information about the Pee Gee and how to care for it and turn it into a tree.

white flowers pee gee
Beautiful White Flowers of the Pee Gee Hydrangea

Chicken on the Grill: Food on the 4th of July

grilling chicken Happy 4th of July to my fellow Americans. Here in New Hampshire it’s a dark and rainy day and we won’t be doing any grilling. But a few days ago, before the heat wave hit, we grilled up some huge chicken breasts to use for our “no cooking” meals. It’s always difficult to find food to feed the family on muggy hot days. I could easily eat a salad, or have cheese and crackers (with wine of course), but my kids want more.
So I headed to Roys’s Market in Peterborough where the chicken pieces were humongous and bought six pieces.   I marinated them in my special, homemade marinade, and my older son grilled them for us.  It’s been enough for the 4 of us to eat for 3 days. I’ve made chicken salad sandwiches, quesedillas, and enchiladas. Today we will finish up the enchiladas and maybe get some clams and seafood from Kimballs. Not cooking in the heat is top priority for me.  We may drag out the ice cream maker and cook up some of that!
So happy 4th to everyone, whether you are grilling, eating out or whatever. Be safe on this American holiday and enjoy the fireworks if it’s not raining where you are.

New Free Hydrangeas – Propagating My Blushing Bride

how to propagate hydrangeas
The Blushing Bride after 2 new plants were dug

Last summer I had noticed that my ‘blushing bride’ hydrangea had low-lying branches which were taking root. I had successfully propagated a hydrangea before – started a new bush from an existing one – by digging up a rooted stem and transplanting it.

There is all kinds of info about taking and rooting leaf cuttings to begin a hydrangea plant, but the ground root layering method will give you a larger plant with a stronger root system. And you have an instant new shrub.

Click my link above to see my story about doing this in the past, or follow along here on my blog, and I’ll explain what I did this time – with pictures!

This method of gaining a new, free plant for your yard (or to give to a friend) works with the macrophylla variety of hydrangeas which tend to have branches that grow close to the ground. In my yard I grow the blue endless summer and the white blushing bride which are this type. Their flowers are rounded and the color of the flower can be changed according to the soil conditions.

Once you find those low lying branches and find one that is rooted to the dirt, tug gently to see if it’s rooted well. If it comes right up, put it back (cover it with lots of dirt) and add a weight (like a rock) to hold the root down into the soil. I leave those to dig up at a later time.

rooting hydrangeas
The rock will hold the stem in place until the roots get larger and stronger.

The offshoots that I dig up are well rooted and look like little hydrangea plants all on their own. It is easiest to do this in Spring before all the leaves have come out and make it difficult to see around the base of the shrub. As I searched around the base of my original plant, I found one well-rooted shoot by itself, and two that were so close together that I kept them as one plant.

Clip the stem(s) that run under the dirt from the original plant to the new one. Dig around and down under the new plant as best that you can and put it in it’s new home. It helps to know where you will put it, and get that area ready before you dig up the new one! Do you know how to plant hydrangeas?

picture tutorial to propagate hydrangeas by root layering
Find the stems to cut and remove the new little plants from the original.

As with all newly planted shrubs, give it plenty of water and watch it each day to make sure it’s doing well. Lots of sun will make this type of hydrangea wilt, but after watering it should bounce back.

I now have two new ‘Blushing Bride’ plants (see my pics below), and best of all they cost me nothing but a little time!

baby hydrangea bush
New plant #1
propagated hydrangea plant
New hydrangea plant #2

One of these new plants is blooming with three flowers in just one years time. Read this post about the new Blushing Bride plant.

Get a Tick Key to Remove Those Nasty Critters

tick key tick removal
Remove Ticks Easily

I can’t remember how I heard about the tick key, but I am glad I have one. In fact I think they come in sets too, and it might be a good idea to have more than one since it’s easy to lose track of it.

The shape of the opening narrows to a point and I’ve used it to remove 2 ticks from my cats. Just slip the wide end over the tick and slide it down to the point. The tick comes right off – head and all. It’s so simple! Wish my photo was better, but you get the idea. I hate these things, like everyone else, and getting them off the animals was always such a chore. Then I’d worry if I’d removed the whole thing.

I find most bugs to be interesting and usually helpful. But there is no reason for ticks to exist, as far as I can see. Lime disease is so bad in New England, we have to find the best ways to avoid getting ticks in the first place. But if you are bitten, or you furry family member is, try the tick key – I think you will like it.
tick key and tick