Be careful when buying sunshine mimosa as a ground cover. I made the mistake of growing the type that has thorns on the stems!
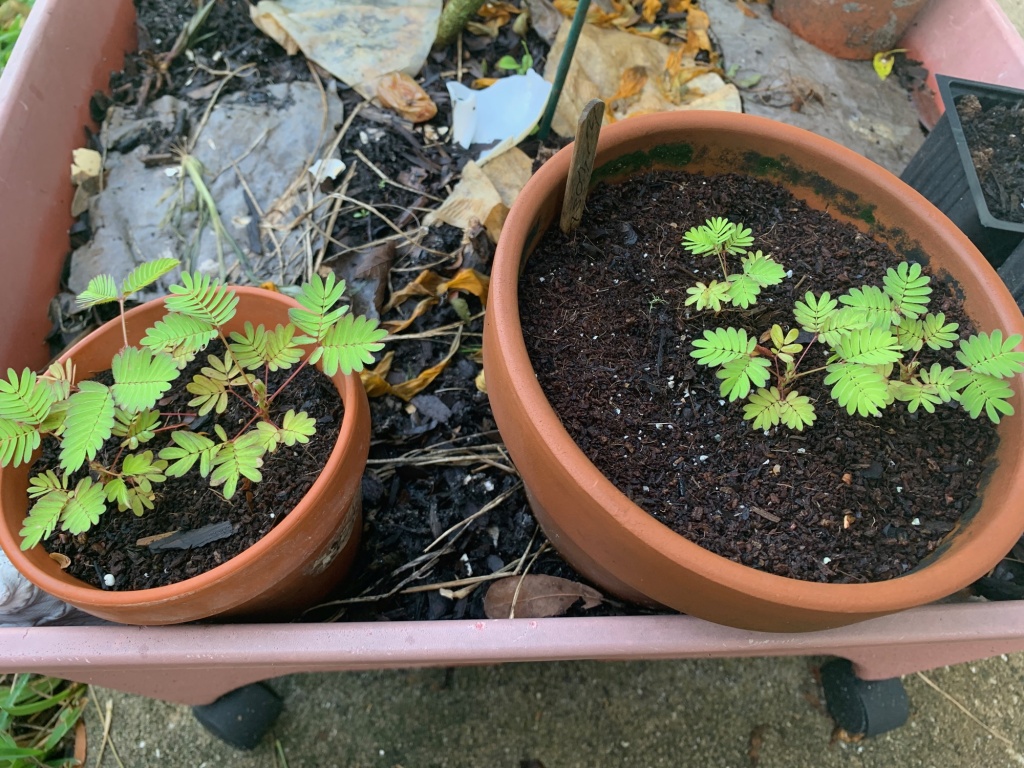
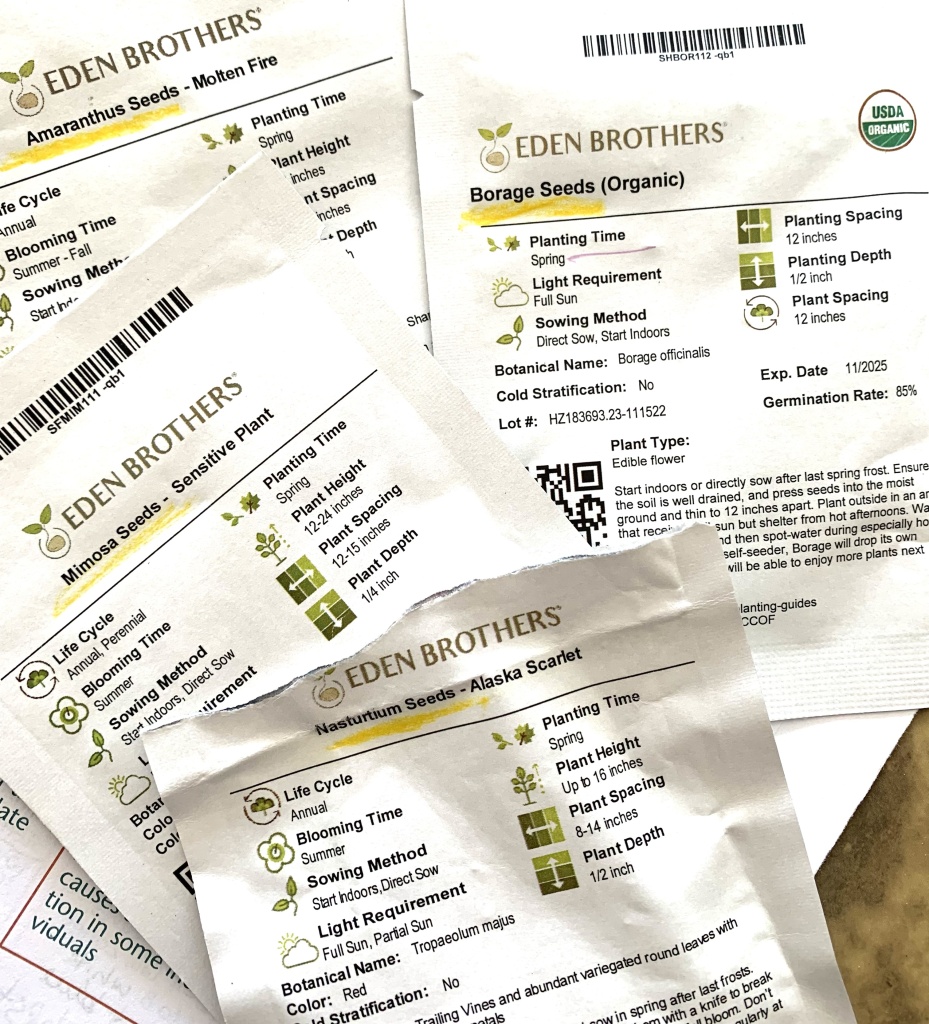
About a year ago I ordered Mimosa seeds. I did not realize there are different varieties of Mimosa and I got the “Sensitive Plant” or “Shameplant”. It is called Mimosa pudica.
What I wanted was the Sunshine Mimosa I had heard so much about. Plant it in the yard to replace grass and feed the insects. Brighten the landscape with pretty pink, puffy flowers. It does not have thorns.
I made a big mistake when I ordered the wrong seeds. The seeds I grew became plants with thorns on the stems.
Sunshine mimosa plantNot all mimosas are alike!
The One With Thorns
Once my mimosa seeds began to grow, I was so happy. Then, I noticed thorns on the stems. Because the Sunshine Mimosa is known as an excellent ground cover, I was baffled. No one would walk barefoot on this! Animals would hurt their feet as well. I thought I had been steered wrong.
I gave up on Mimosa.
Recently, I saw a post on Instagram by The Urban Harvest. The post was about alternative ground covers, including Sunshine Mimosa. I left a comment that it has thorns, and was quickly corrected. “Sunshine Mimosa does NOT have thorns”. Any they are correct!
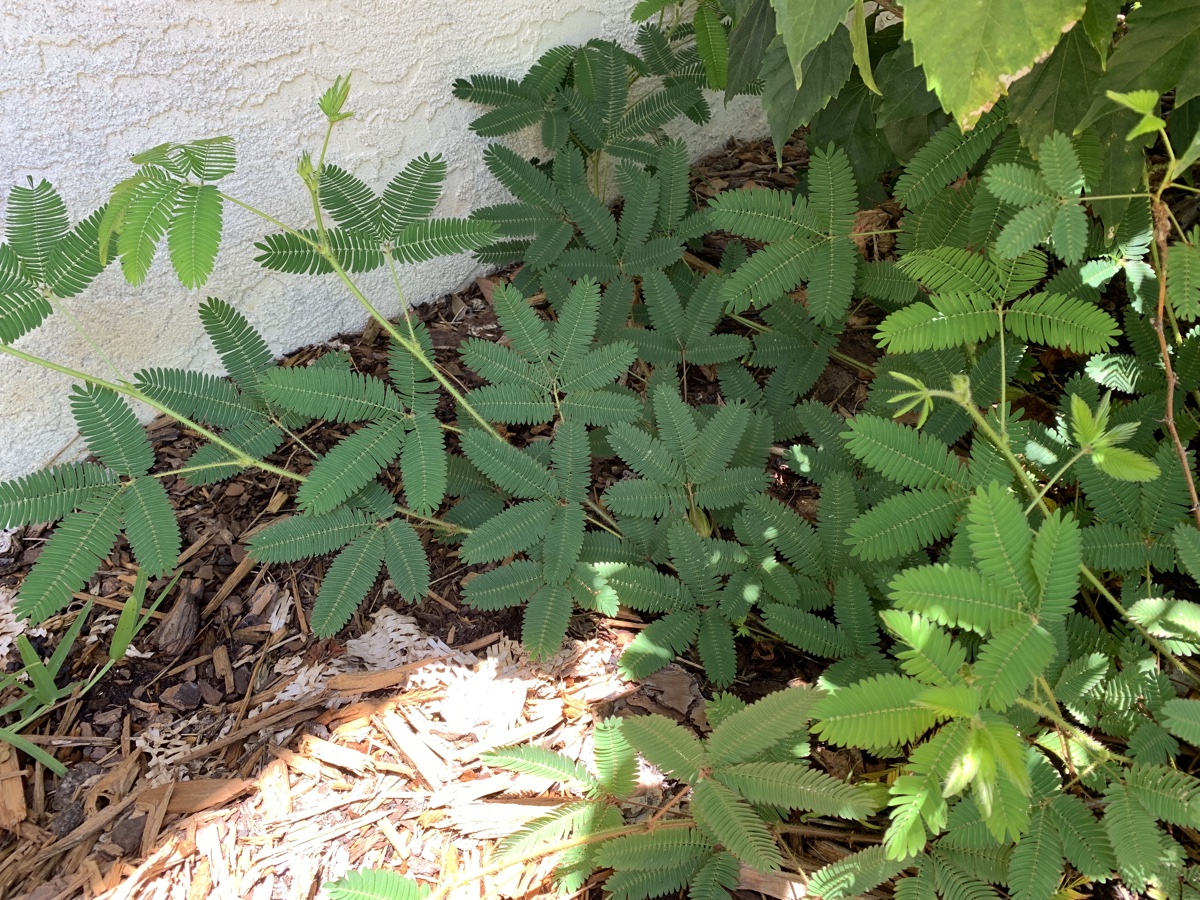
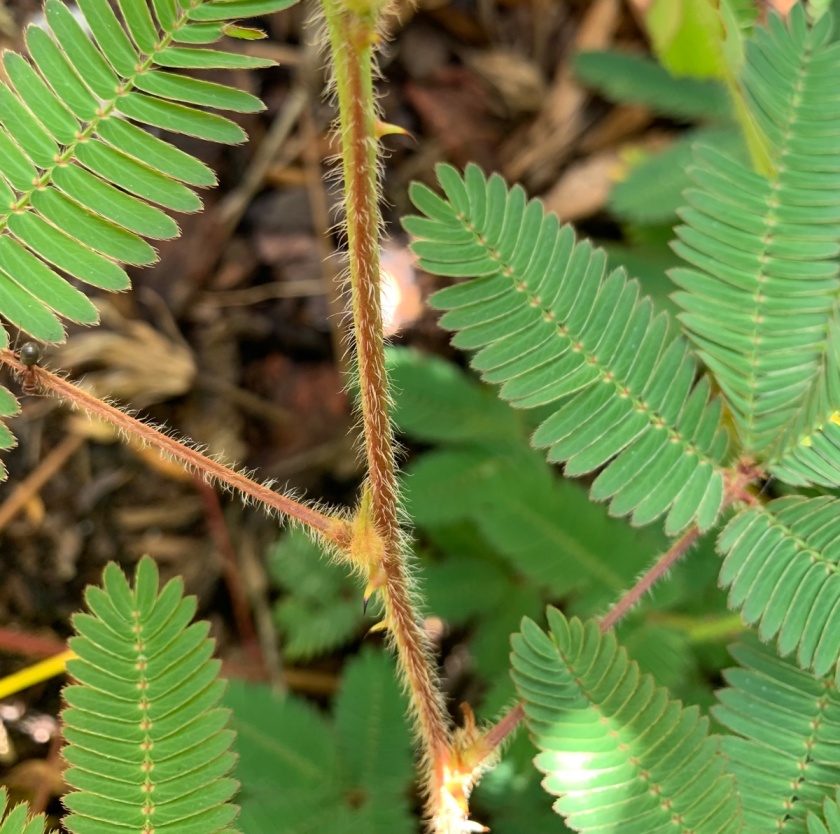
So what the heck did I have? I took this photo of the plant in my yard and discovered that it is a mimosa, but the wrong kind. See those thorns? I will probably rip this one out.
the Wrong Mimosa
The Sunshine Mimosa is Mimosa strigillosa, or “Powderpuff” and is thornless – and N O T Mimosa quadrivalvis, or pudica. Be sure to know which type you are getting.
Be careful, because the different varieties look very much alike. They both get pink, puffy flowers and have leaves that close up when touched. Both types sprawl, but the thorny one grows taller.
The huge difference is that one has thorns, and the other can be used to replace your grassy yard with a blooming, soft, ground cover.
Where Can I Get a Sunshine Mimosa?
The trouble I had a year ago was that I wanted this ground cover for my yard. I looked for plants and seeds and found NONE. All I found was mimosa seeds from Eden Brothers and so I bought them, not realizing I’d ordered the incorrect type.
The info in the pink box comes from the Florida Wildflower Foundation website. And, YAY they have a link to a place to buy seeds…. but, guess what? No results.
All my favorite online places don’t have seeds. I get very frustrated when I live in Florida and yet have such trouble buying native plants.
I still can’t find Sunshine Mimosa seeds to buy.
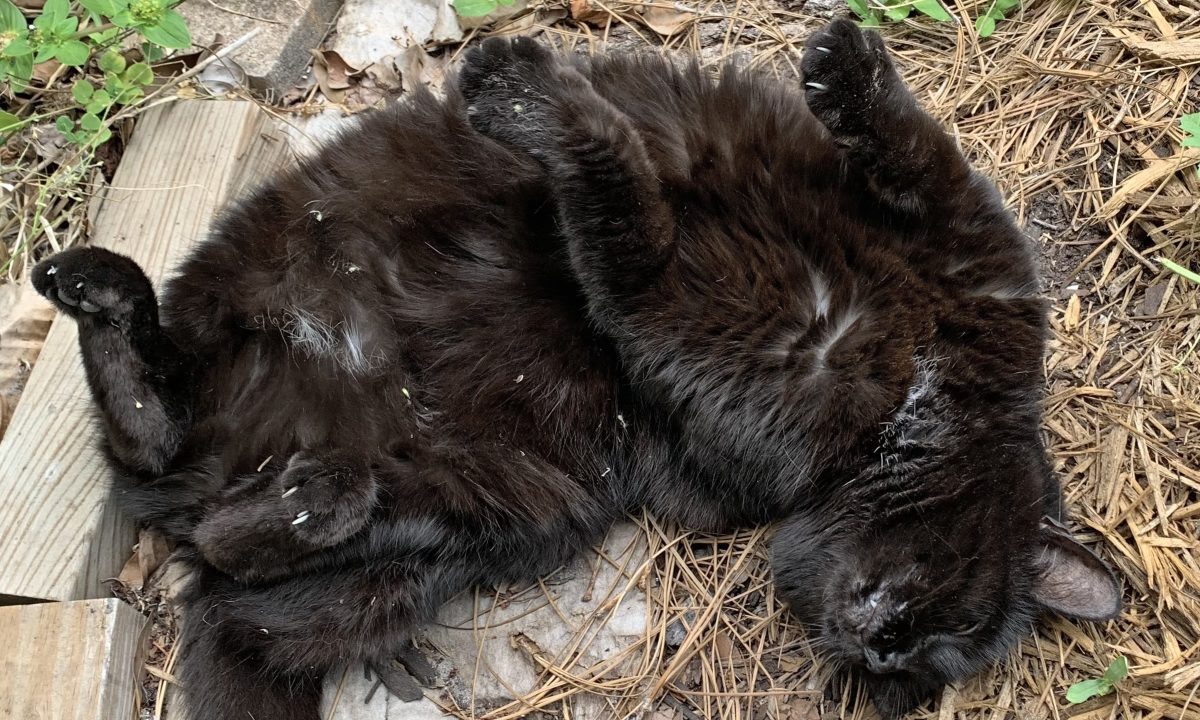
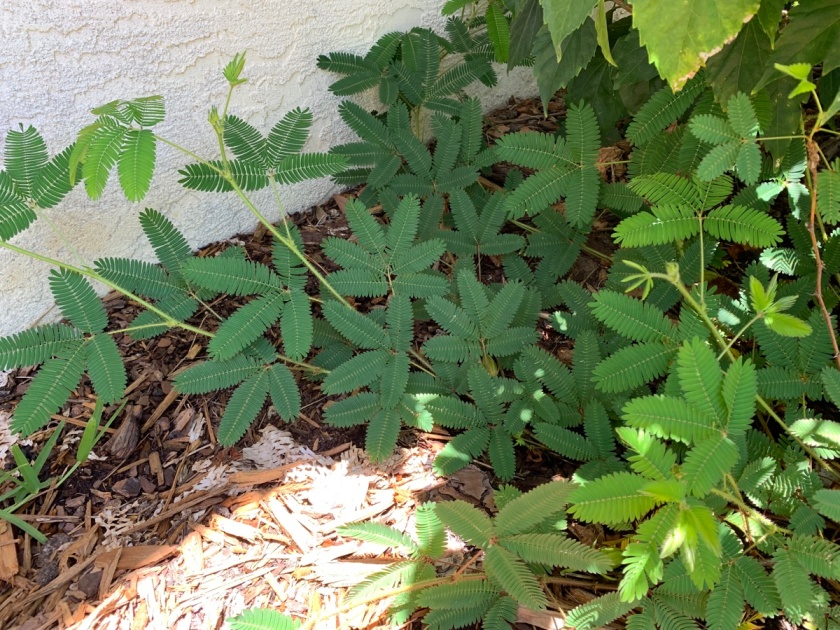
I’ll be ripping up the one that has thorns. I don’t want my cats hurting their feet.
I probably shouldn’t say this out loud, but I am very happy with the way my pepper plants are growing! I have yet to pick a pepper, but my fingers are crossed.
Peppers are a vegetable I would LOVE to have growing in my yard. I like them sweet or hot, and preferably would have both types to choose from. I use peppers quite a bit in my cooking, but currently I have to buy them at the store.
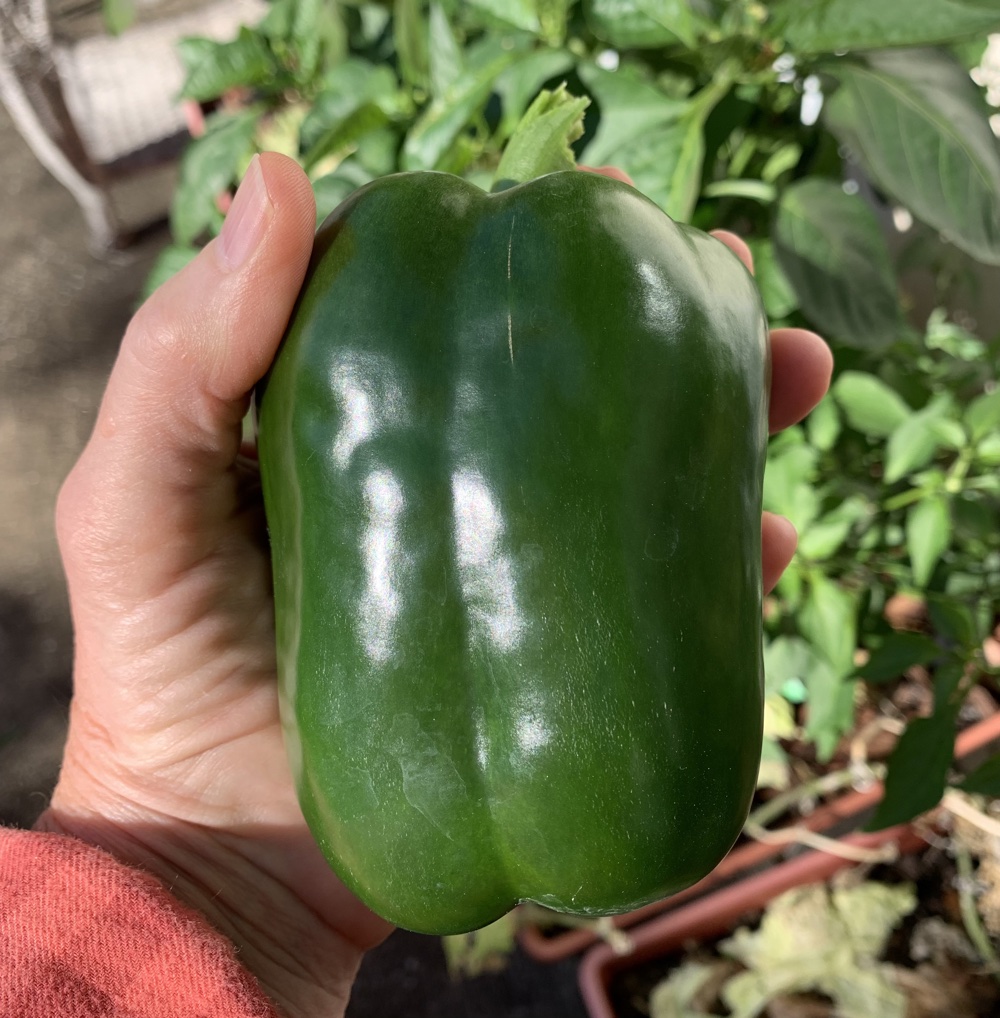
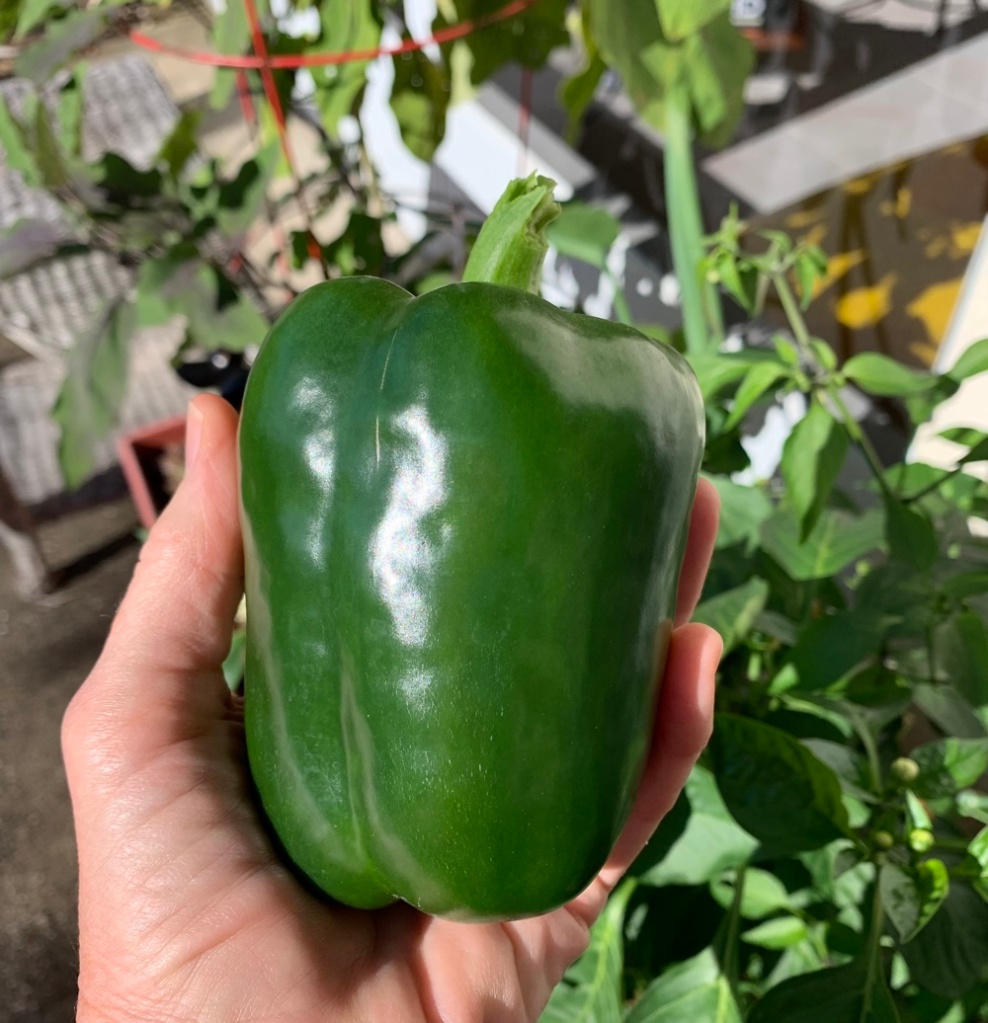
You’d think that in this hot climate peppers would grow like mad. In fact, I’ve had bell pepper plants (photos below) that lasted for a few years. But getting a good plant started, and have it grow lovely peppers, can be a challenge.
Home grownGreen bell pepper
I still don’t have a car, so the best way for me to grow peppers is to order seeds. Also, most stores / nurseries around here don’t offer the types of pepper I want to grow. If you can buy seedlings to grow, of a variety that works for our climate, that is the way to go. Seeds take forever to turn into lovely plants.
How I Grow Peppers From Seed Successfully
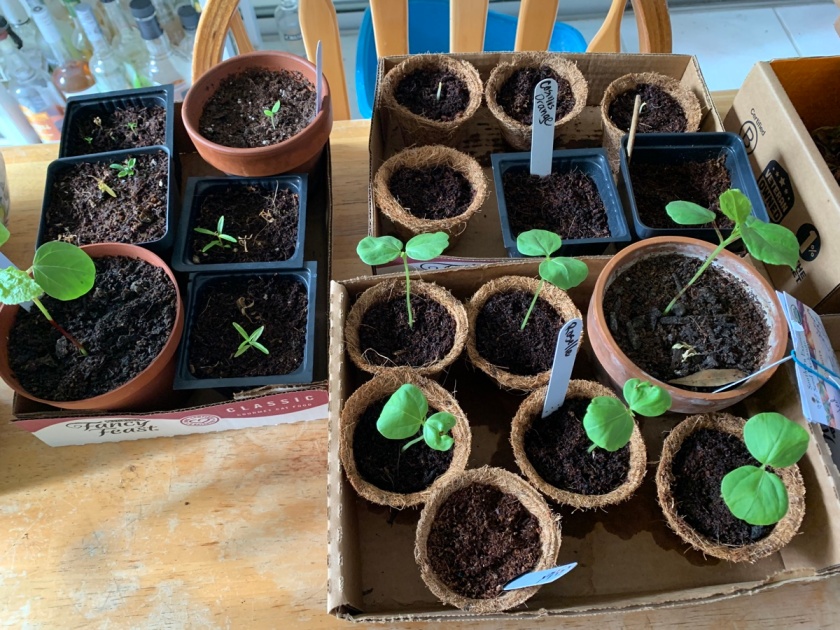
The way to be successful growing peppers, is to plant seeds outside in grow boxes. Plant lots of seeds because most of them may not grow.
Once the little pepper plants grow big enough, separate them by transplanting so each plant has space to grow big. Make sure all soil is full of good nutrients.
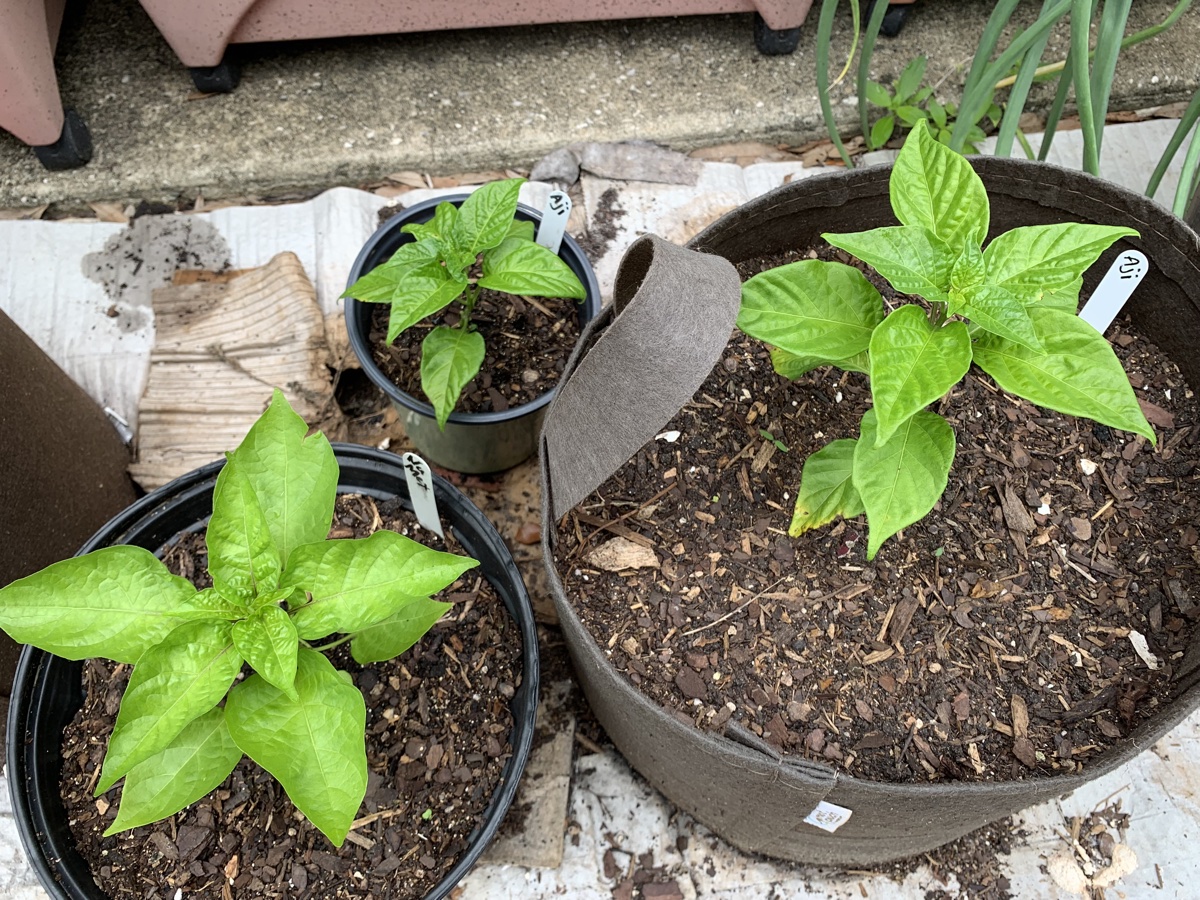
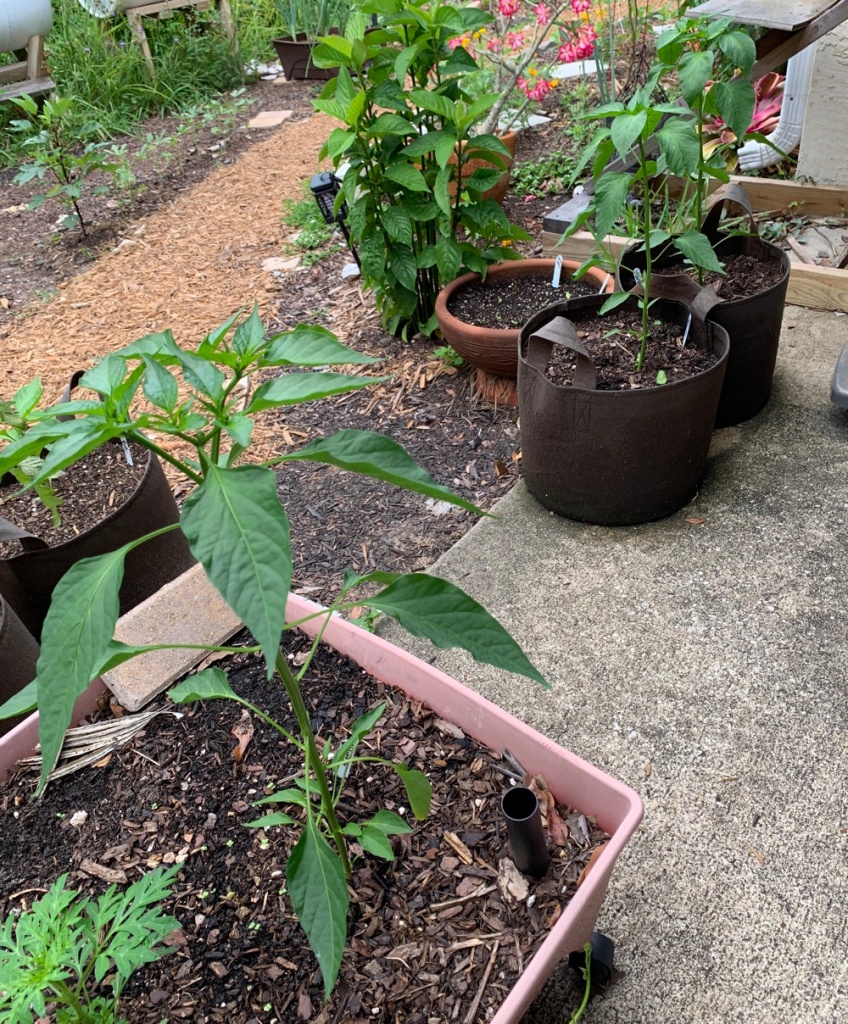
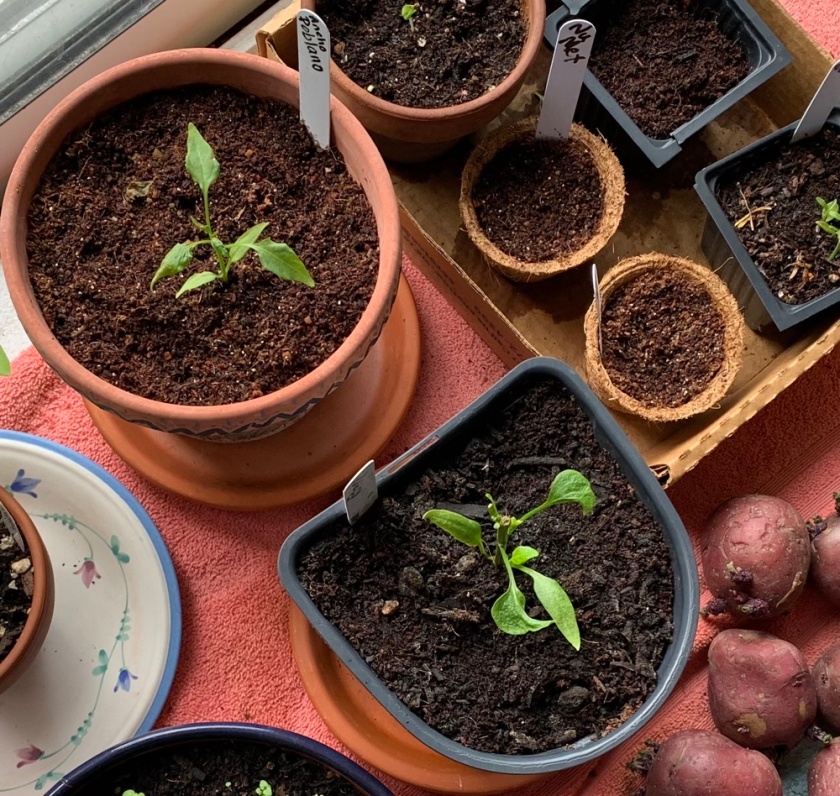
The Ancho poblano pepper plants, shown below, were started from seed in the red (faded to pink) grow box. I left one plant in the box and the other two were each given their own fabric pot. I love the flavor, which is not extremely hot when eaten green. I really hope these pepper plants grow well.
Ancho poblano pepper plantsEach poblano has it’s own pot
These plants were quite tall when I transplanted them because I had been away for two weeks. Usually I would transplant sooner.
*Update on the poblano: Suddenly the two plants in the grow bags drooped horribly. they ended up dying. I still have the one in the square box.
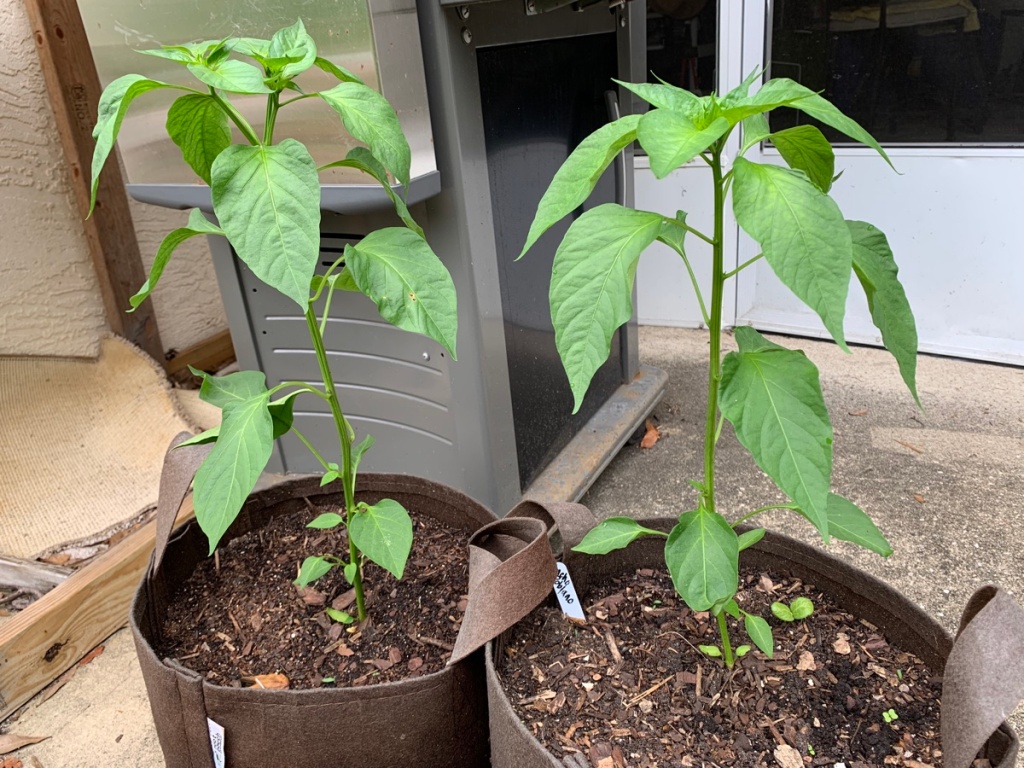
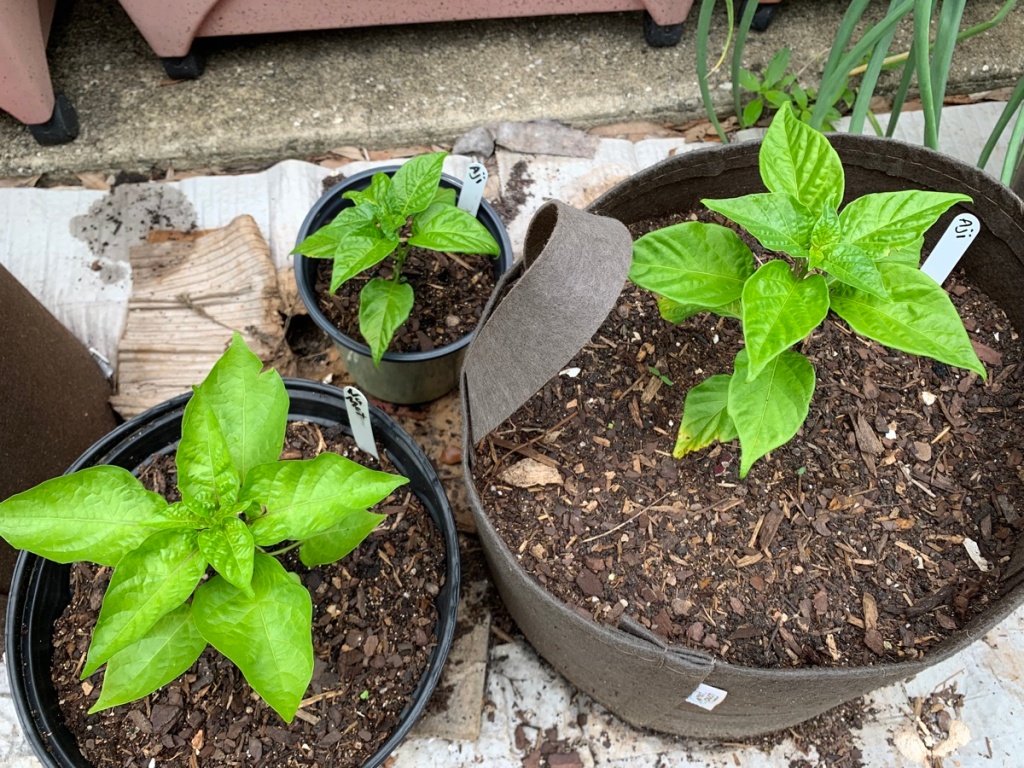
Aji Dulce and Suave NuMex
The Aji Dulce plants were growing side by side in a small pot. I didn’t know if they would separate well, but both plants are doing great. I think the trick is to let them get a good root system established before separating.
The Nu Mex variety (below) were also growing in a red box. Once they were big enough, I transplanted one to a plastic pot, leaving the other in the red box.
Suave NuMex Ali and Nu Mex
Be sure to mark the plants in some way because pepper plants can look a lot alike. Both of these varieties will have peppers that resemble a habanero, but they don’t have the heat.
Pepper plants started from seed are slow growing! You must have patience to grow peppers.
Carolina Wonder Bell
As an example of what I do, see the box in the photo below. It contains Carolina Wonder Bell pepper plants. I had two larger plants in this box and transplanted one to a big pot. There are still two tiny seedlings coming along (circled), which I will also transplant when they grow up. The remaining plant will stay in this box to continue to grow.
Carolina Wonder Bell pepper plants
Don’t Bother With Starting Plants in Small Pots
I’ve found that growing peppers from seed can be difficult. The seeds germinate, and the pepper begins to grow and then, just when I think it will be fine, the thing curls up and dies. This was my experience over the “winter” when I planted seeds in little pots.
Plants do best when growing outdoors. Some people may disagree, but I have little luck with starting seeds and caring for seedlings properly. They have proven this to me by getting bugs and dying. Or, they die once they go outside. In fact the only seedlings that are now growing in the yard, and doing very well, are the Roselle hibiscus.
Pepper seedlings are not looking good over winter.
In Florida, we have only a few months (central Florida) where a frost, or freeze, happens. December through February are the usual months to worry about. We can also get very warm days in these months. To be sure the little seedlings won’t freeze, planting outside should take place in March.
Grow Peppers For the South
In our hot and humid Florida climate, certain types of pepper do better than others. This year I have planted all three varieties mentioned on this page and they seem to be doing well, so far.
But take into consideration that I sprinkled seeds all over these boxes and ended up with only a couple of good pepper plants from each variety! But, let’s face it, how many pepper plants does one person need? If these all do well, and give me peppers, I will be more than pleased.
Suave NuMex Carolina Wonder bell Ancho poblano pepper plants
More Tips and Tricks For Pepper Success
Pepper plants can continue to grow for a few years in zone 9b. I had a bell pepper that remained outside all winter and survived! But if the plant is in a movable pot, or fabric bag (paid link to Amazon), it can come inside during cold spells.
Peppers in pots can also be moved into shade if the sun becomes too much in mid-summer. Right now, most of my peppers are in locations that get afternoon shade. (I put up a beach umbrella for them too.)
Pots will hold nutrients and fertilizer better than the ground.
Pots help keep critters (raccoons and armadillos) from digging up plants.
Give them nutrients. Epsom salts (paid link to Amazon) give peppers and tomatoes the magnesium that they need. I also mix bone meal, kelp meal, blood meal, worm castings, vermiculite, compost, and whatever else I have, into the soil.
Spring is a busy time for me with garden plans and life plans colliding.
In Florida we don’t get a break from the growing season. Something is happening year round in the garden and yard. In a way, this is good. What fails at one time of year can maybe be tried again in a few months. We don’t have to wait an entire year for the growing season to return.
It also means we gardeners stay busy year round, planning and planting. This is only my second year trying to expand and grow here in east, Central Florida.
Plans and Planting and Juggling it All
Every time the first of the year rolls around, I find myself swamped. This was true even before I began to garden.
After cleaning up from the holiday season this year, we had a few camping trips planned. Also, both of my cats had to go to the vet for their annual shots, AND I needed to get new eyeglasses. (Did I mention it is also an expensive time of year?)
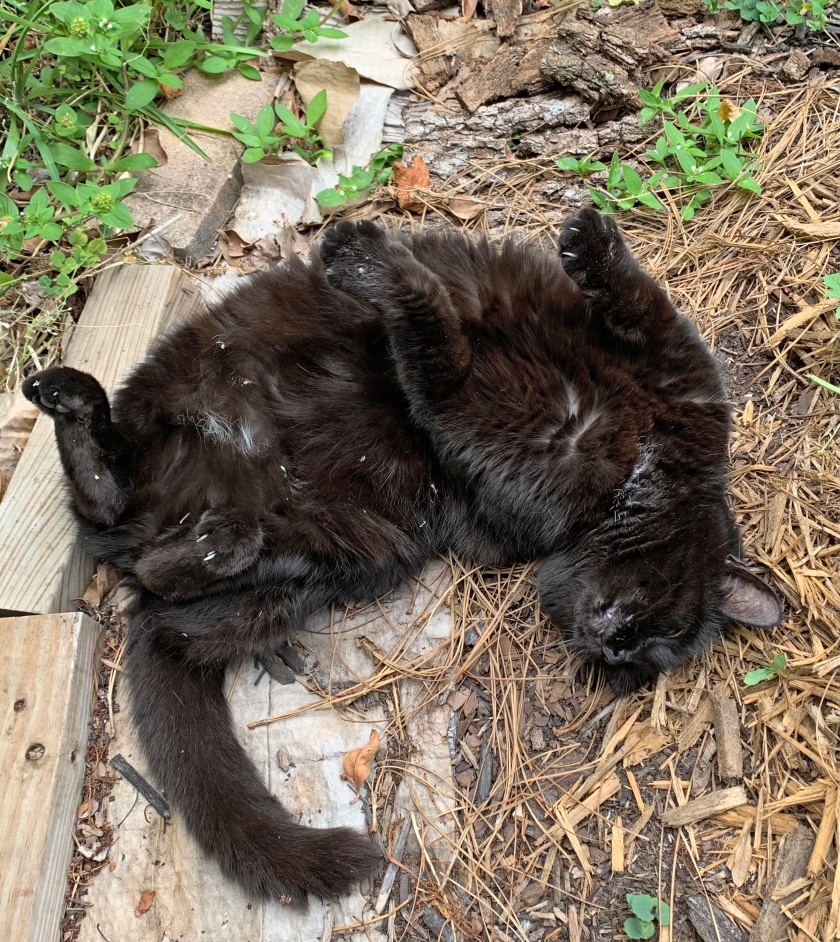
Skittle – Learn to chill like a cat
My high school class reunion (a milestone 50th, wow) was being held in April. I had originally planned to skip it, because it meant traveling to New England. My daughter wanted me to come up to New Hampshire for a visit, so I combined the visit with the reunion. But first, my youngest son came for a visit! Busy, busy.
In between all these life plans, I had to do Spring gardening. I bought mulch, compost, and seed packets. Transplanted crops beginning in February, and did weeding, cardboard layering, digging and watering.
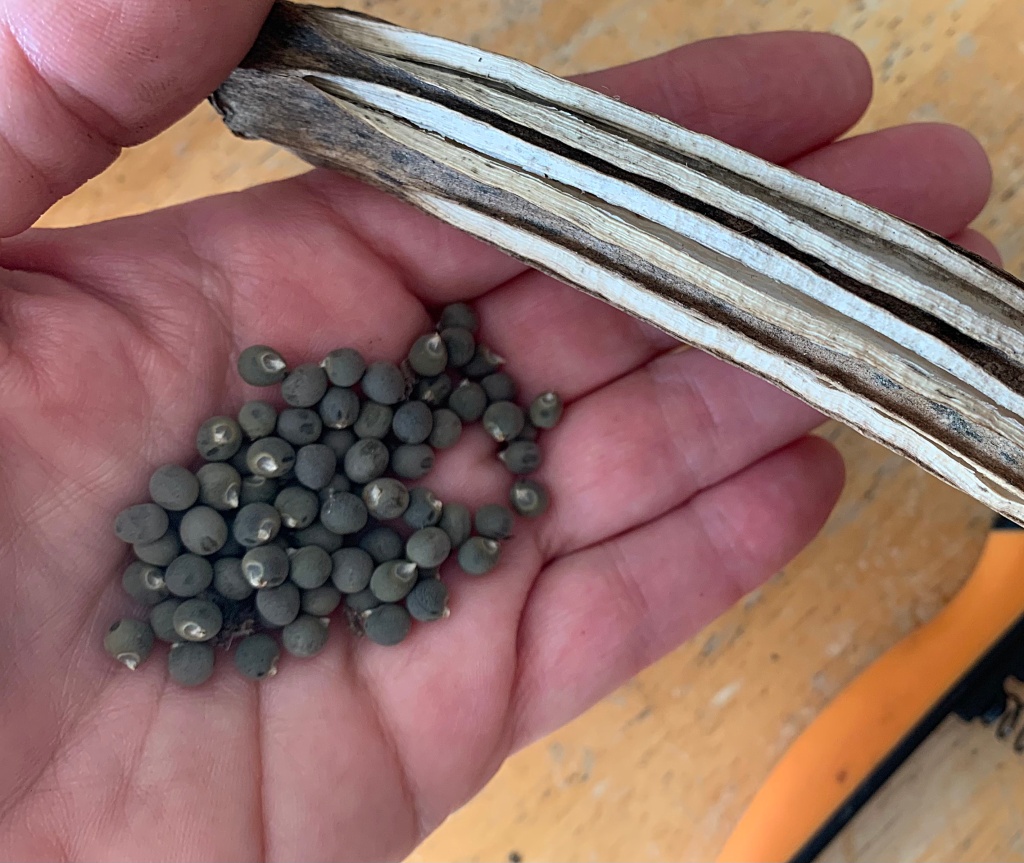
Saved okra seedsBorage flower
While I was up north for two weeks, we got ZERO rain in the area of Florida where I live! My son was watering, but without good soakings, the ground all dried out. Once I got back home, I spent every morning trying to get water into the ground for my plants.
Finally, almost a week later, we had some much needed rain.
Rainclouds bring much needed rain to the area.
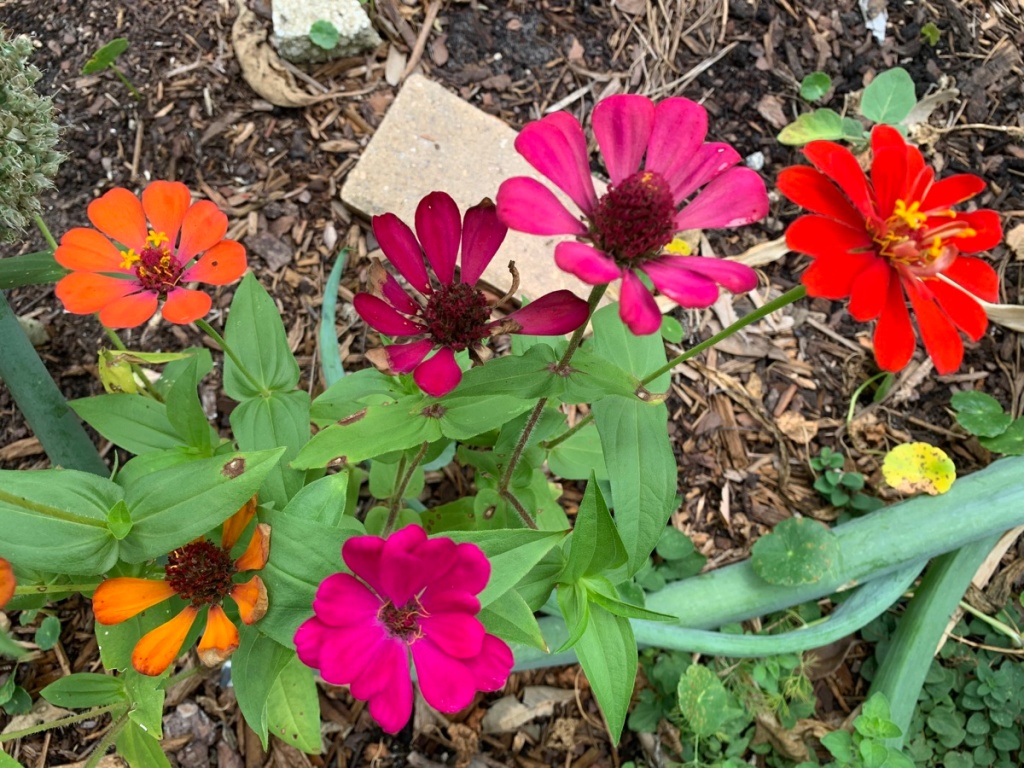
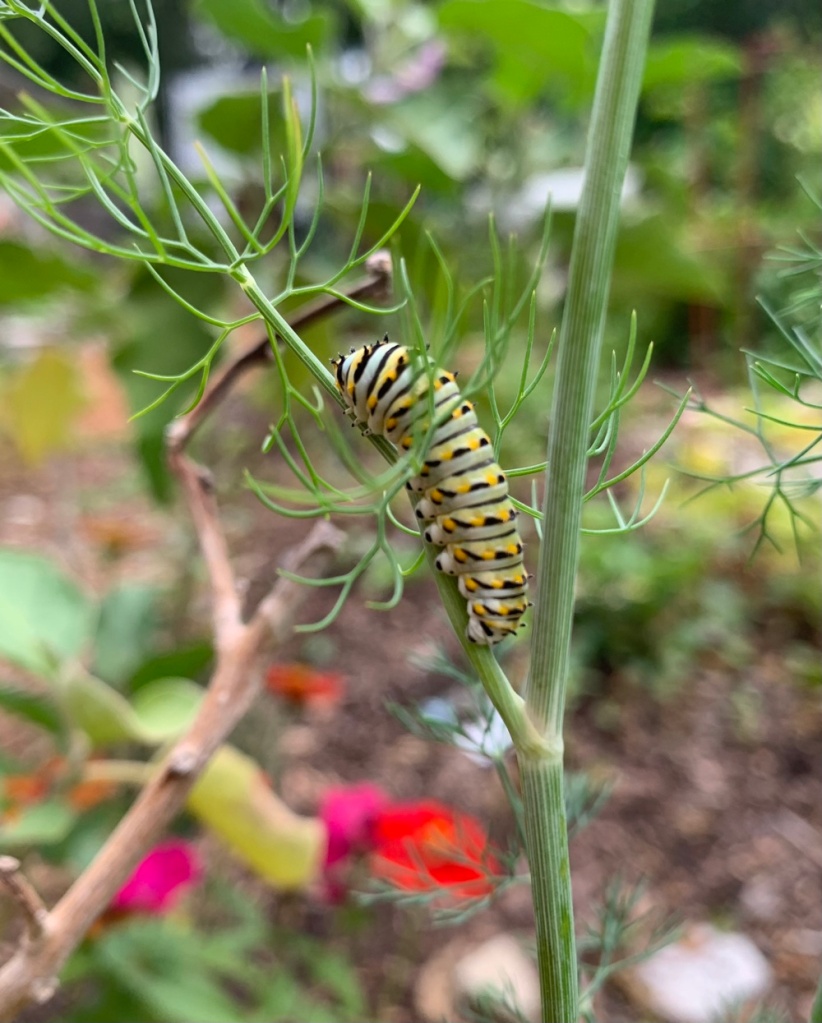
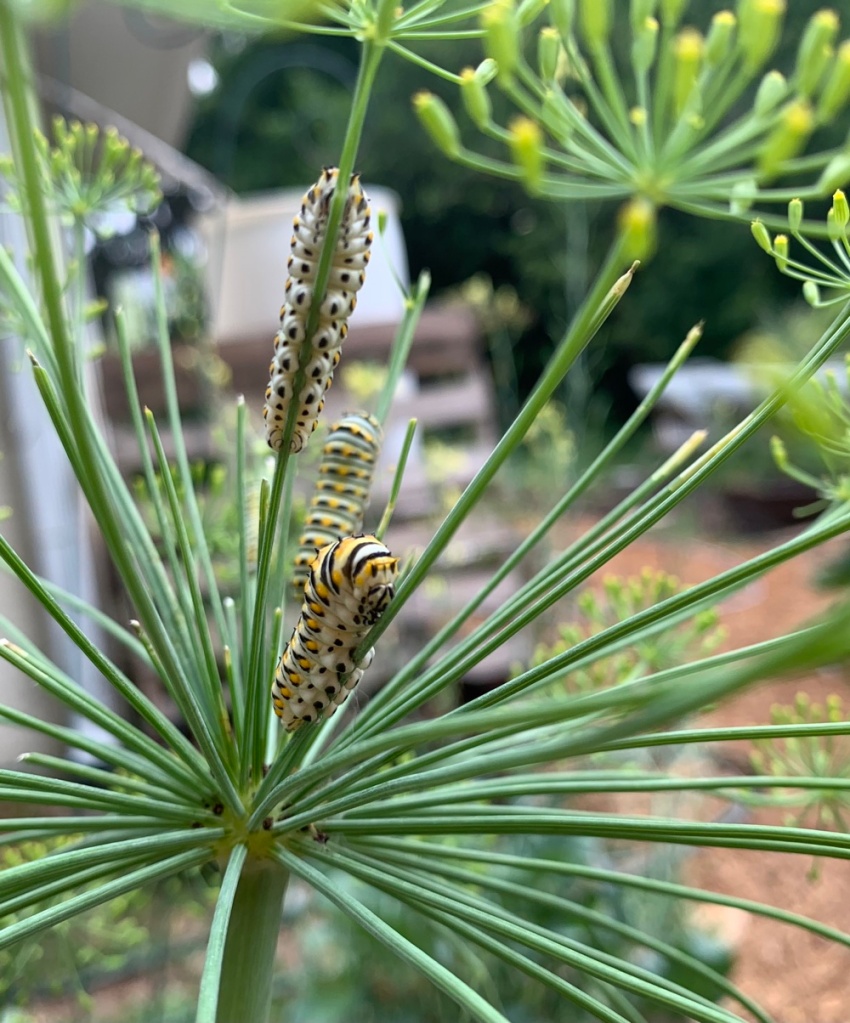
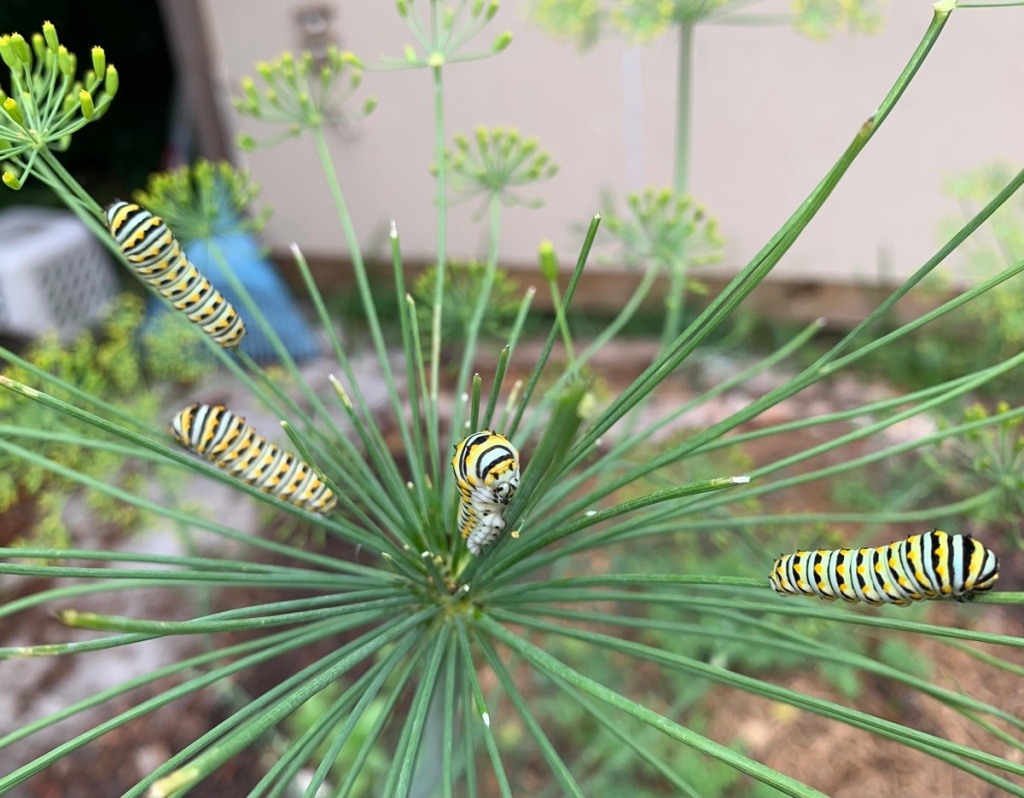
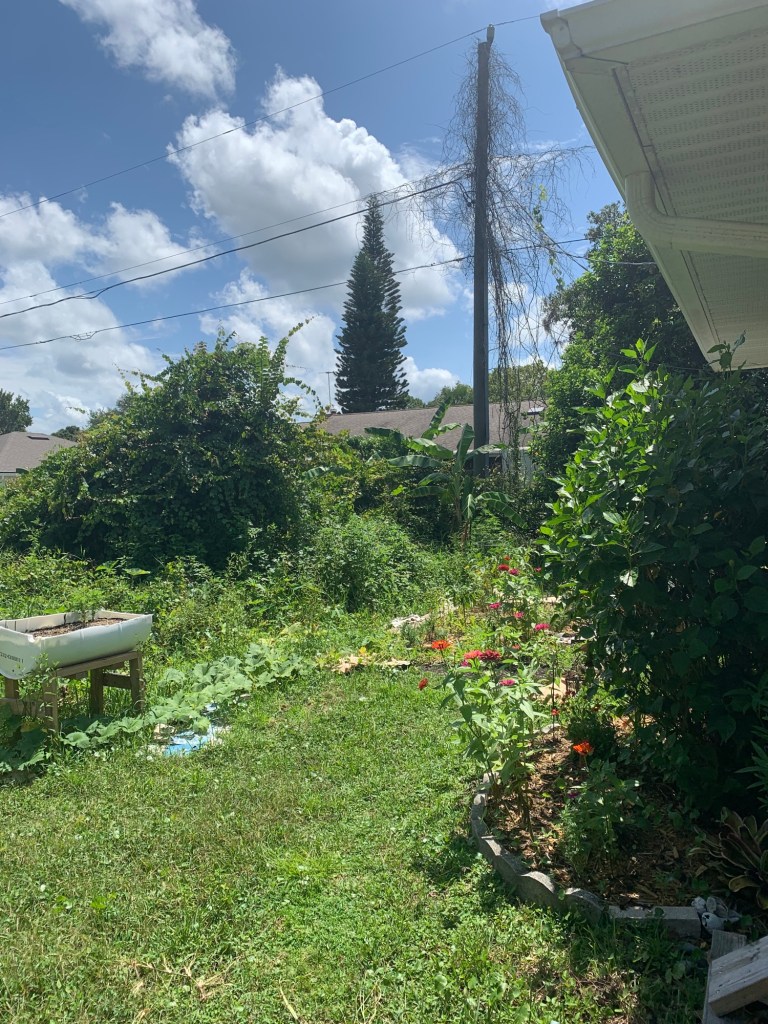
For the most part my plants have survived the drought. The hardy zinnias are blooming, caterpillars are eating the dill, and I’m even picking a few ripe blueberries each morning from the one plant in the garden.
The crops that did not do well are cucumbers and spaghetti squash. I needed to get the cukes growing early to miss the moths that arrive in June, or July. Last year I battled the caterpillars that ate up my plants. To solve the problem, plant cucumber before the moths arrive in the area. Now, it’s too late to re-plant. I also tried a new type called “Ashley” but I may never plant them again.
Spaghetti squash was something new I wanted to try. The plants began by looking great. Just before I left on my trip, they began to get powdery mildew. I sprayed the leaves, but by the time I got back most of the plants had died. The drought didn’t help, I’m sure. It is possible that this type of squash won’t do well where I live.
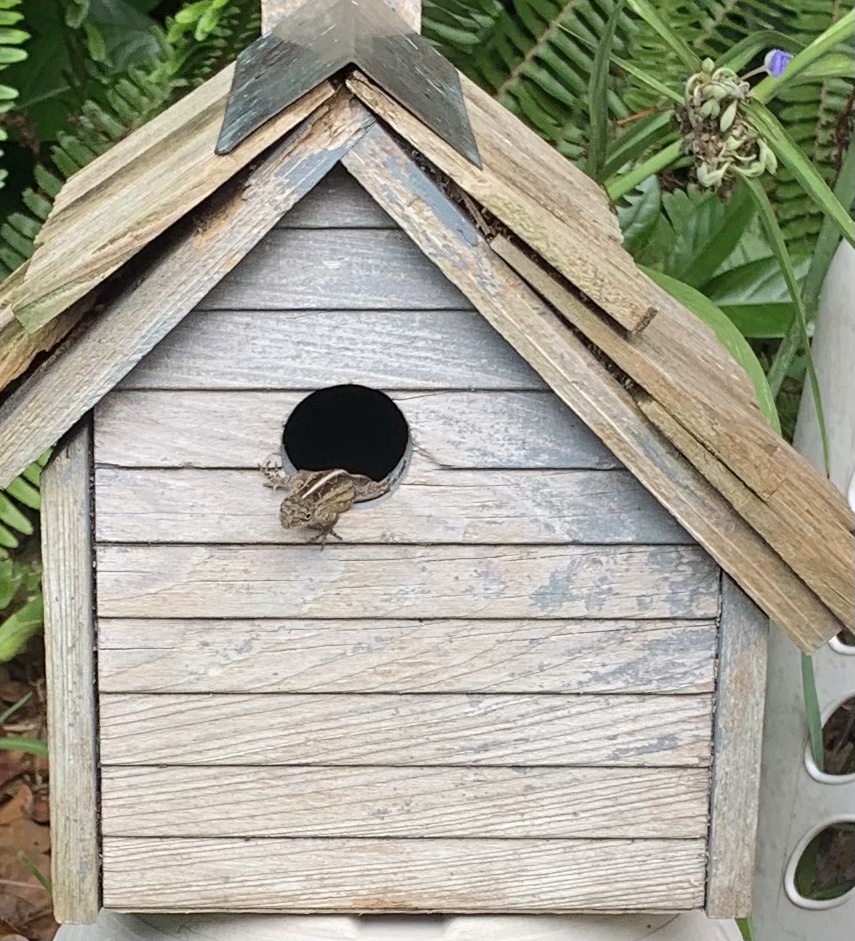
Lizard
It’s good to be back h0me and now I will be gardening regularly once again. I’m trying to keep the watermelon and Seminole pumpkins going. Also, I am growing Egyptian spinach. Will let you know what happens with that.
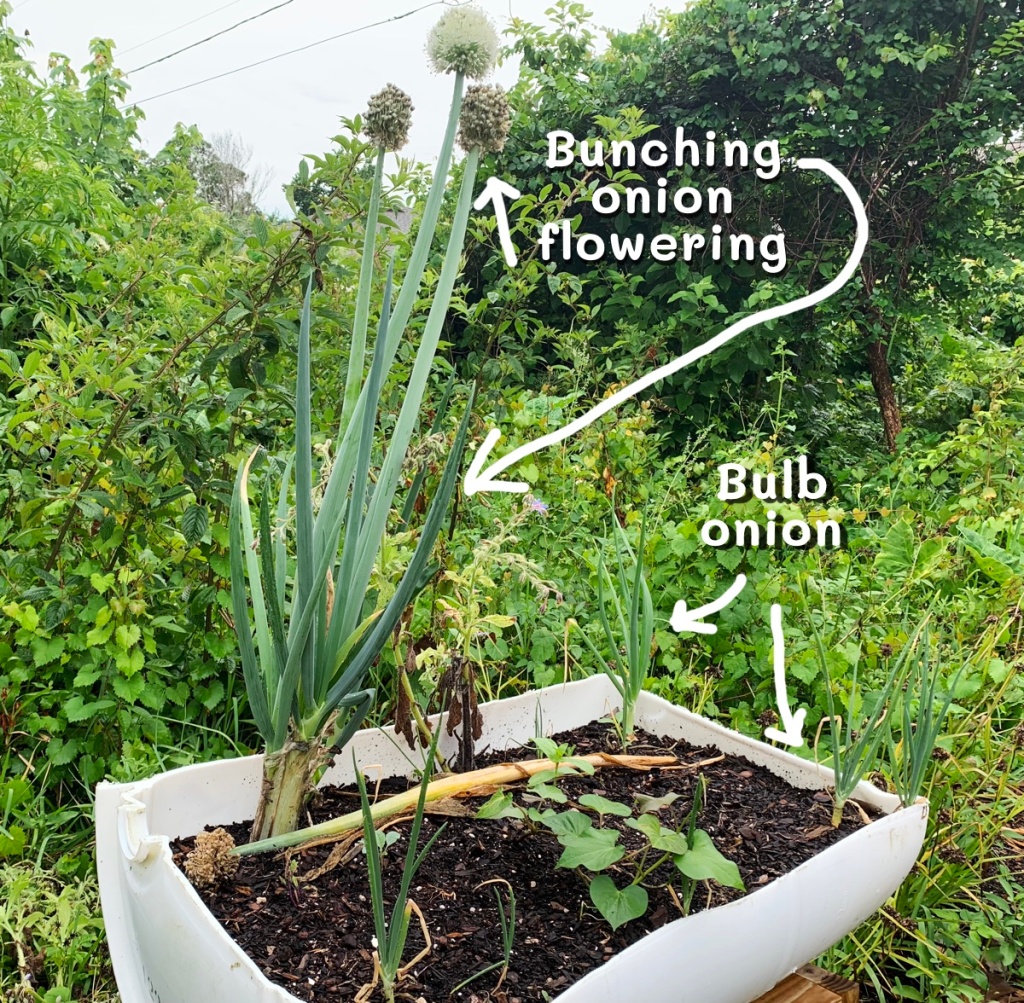
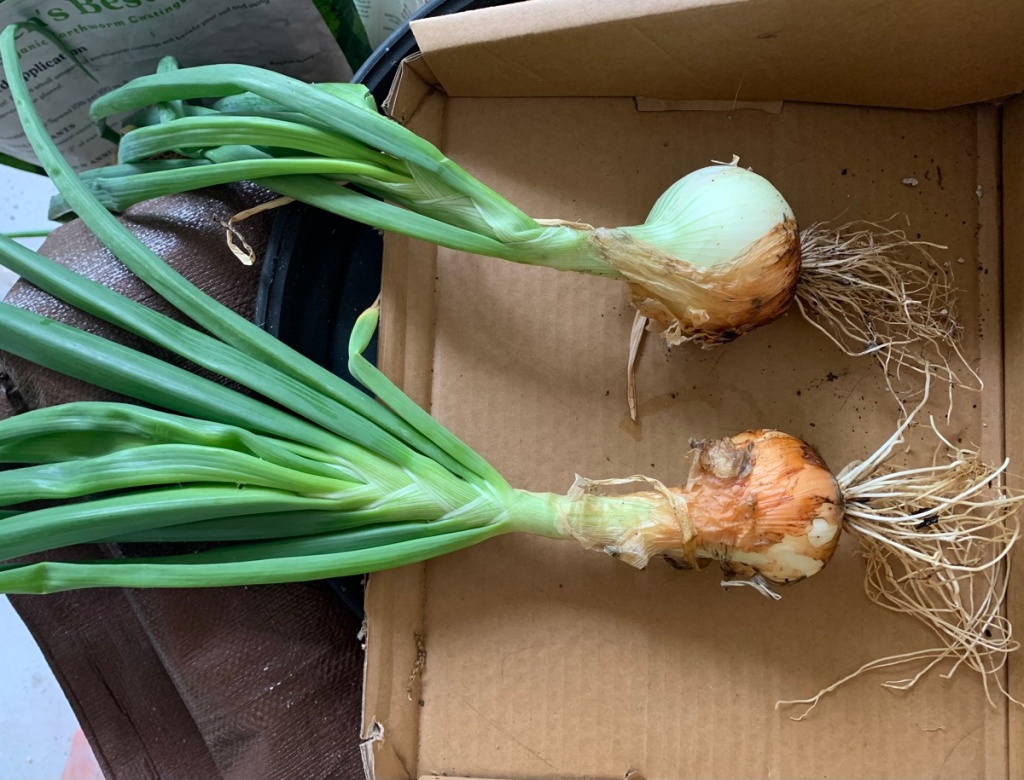
First try at growing Texas Grano bulb onions in my central Florida backyard is a success!
A grower in Deland, Florida had posted about their success in growing Texas Grano bulb onions here in Florida. I hadn’t thought it was possible to grow onions in zone 9b. Now I have tried it over this past Florida winter, and have had some success. I look forward to growing even more next year.
Growing Texas Grano Onions From Seed
After purchasing seeds online, I went around the yard and planted them in raised bed boxes and in the ground.. I didn’t have high hopes for actually getting real onions from the garden. Truthfully, some are still growing and may not turn into anything. I did get a row that grew big enough to call “onions” and their stems just recently began falling over – signaling their end to growing.
Finding good advice for growing ANYTHING in Florida is difficult. But, you can take advice from growers in other zones. I can’t always do as they do, but things like “when to pull your onions”, is universal.
Watch this quick video, from The Rusted Garden, with advice about growing bulb onions.
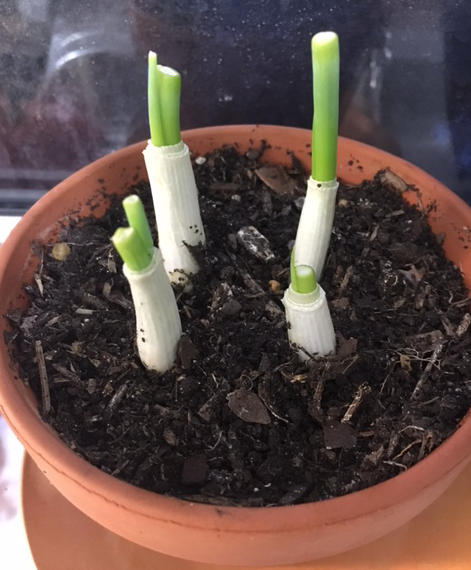
Here in Florida I easily grow bunching onions. Those are the ones that do not get big at the bottom and we use the green stems for eating… unless they are left to grow and grow. The white bottom gets large, and they send out a beautiful big white flower which is where the seeds will be.
Not ready to harvest yetBulb onions still growing
When I want to grow bunching onions, I buy some at Publix and save the rooted ends. Just stick the ends into dirt and a new bunching onion grows from that. I let them get big in my yard so they will flower, because they have gorgeous, big white flowers. Bees and butterflies love the flowers! Once the flower dries, it is full of seeds.
Bulb onions don’t do this – no flower
Let the flower growPlant the ends of scallions and they will re-growGrocery store onions
Why I Chose to Grow From Seeds
When searching for more about growing onions you will find “starts” and “sets”, but I have tried starts and they did nothing. It was a lot of work, for NO return. This was my experience. I decided to try growing from seeds, and it is the method I prefer, now that I’ve seen good results.
I will plant seeds – directly outdoors – once again this coming Fall. Of course, it takes longer for the onions to grow from seed.
Plant seeds in September-October, Harvest onions in May
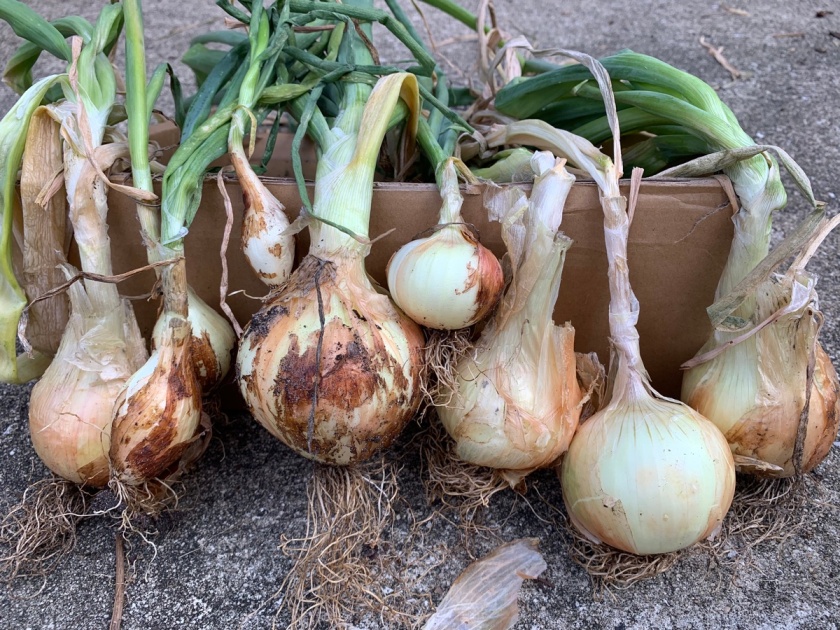
My Onion Harvest
I planted my Texas Grano Onion seeds in October. I am now harvesting them in May. That is a long time – seven months! Not all of them grew, in fact I’d say most did not grow at all, or remain small. I’m waiting to see if the small ones continue to grow.
Tops falling over is a sign they are nearly ready to pull
I purchased the seed packets for Texas Grano onions at SESE (southern exposure seed exchange).
I will admit to not taking good care of my seedlings. My mindset was that they wouldn’t grow anyway, so I pretty much ignored them. Next time, I will be more careful because I know it’s possible to get nice onions from the seeds.
Curing Onions to Save
Once the onions are pulled up, I brushed the dirt off and put them under the umbrella. Now they are on the porch with the fan going. From most articles I’ve read, onions need to cure in a shaded location that is warm with good air flow. What I don’t have is low humidity, but I can’t change that.
Once the tops have dried, I’ll cut them off and bring the onions inside to store and use. A few of the smaller ones I’ve already sliced up to eat! Yummy. What is better than getting food from the backyard?
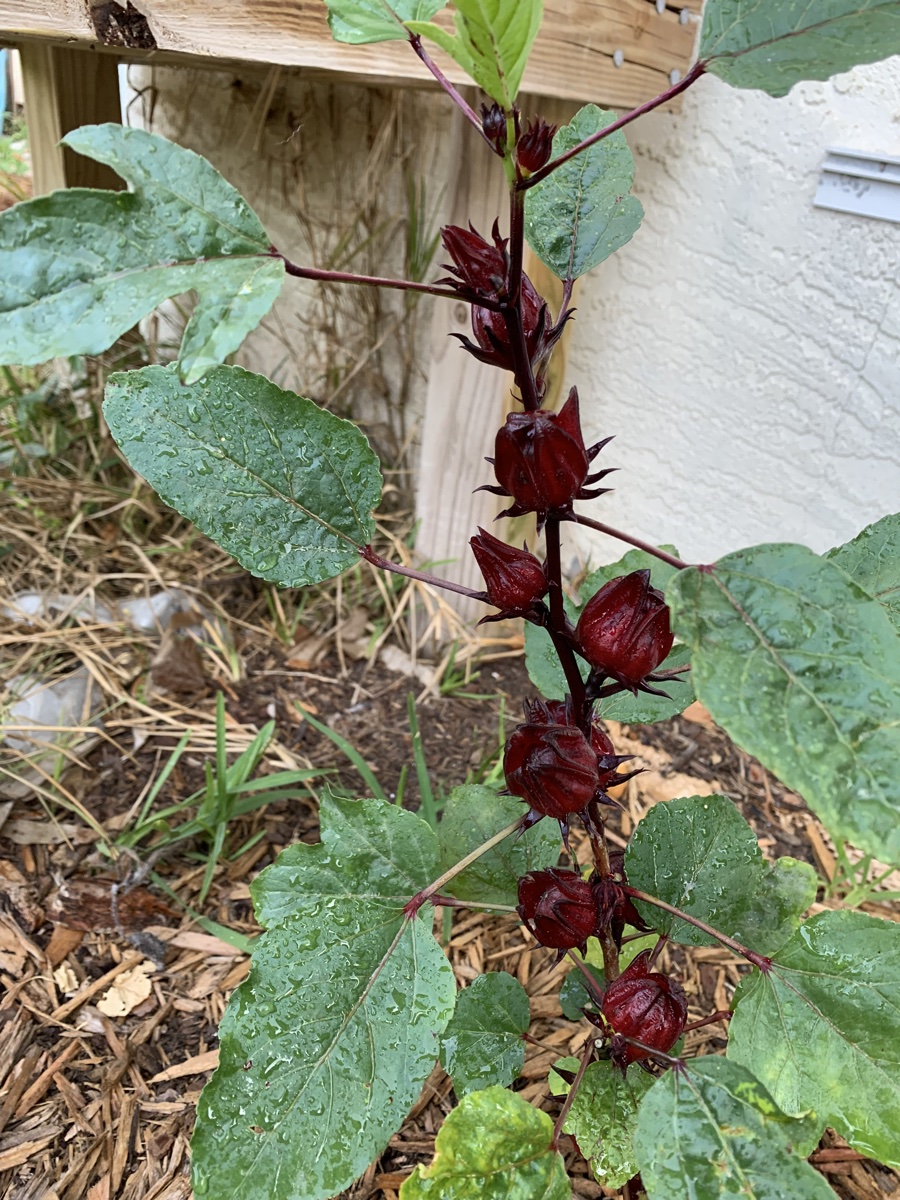
This spring I have added Roselle Hibiscus to my backyard garden. A plant that loves the heat is always welcome to the yard, and this one is also full of health benefits.
Roselle is a name I’ve heard some southern gardeners mention, but I had no idea what it was. Southern Exposure Seed Exchange sells seeds, so I ordered a packet along with my recent seed purchases.
In late fall I planted the seeds in little pots. The Roselle seedlings looked good to begin with, but they eventually got bugs on the leaves. Growing things from seed throughout the winter months is not optimal. A few of these plants did survive, and they now reside in my yard. They are doing great!
Roselle hibiscus seedlings
Unfortunately for me, I have discovered that roselle is a large plant. My yard is fairly small, so I planted the seedlings in various spots. Roselle hibiscus likes heat, humidity and sunlight. It should do very well, but I may have to dig and re-plant for space.
After planting the seedlings this Spring, the Roselles are flowering and making the red bulbs now, in May! I have cut them off. I must find out what to do with them. I’m adding that info here, for anyone else who is new to growing it.
MayMay plantRoselle calyces
Video About Growing Roselle Hibiscus Plants
This video is wonderful. I think this woman lives in Arizona. I like the idea of growing anything that is heat-loving!
Learning About the Roselle Calyces
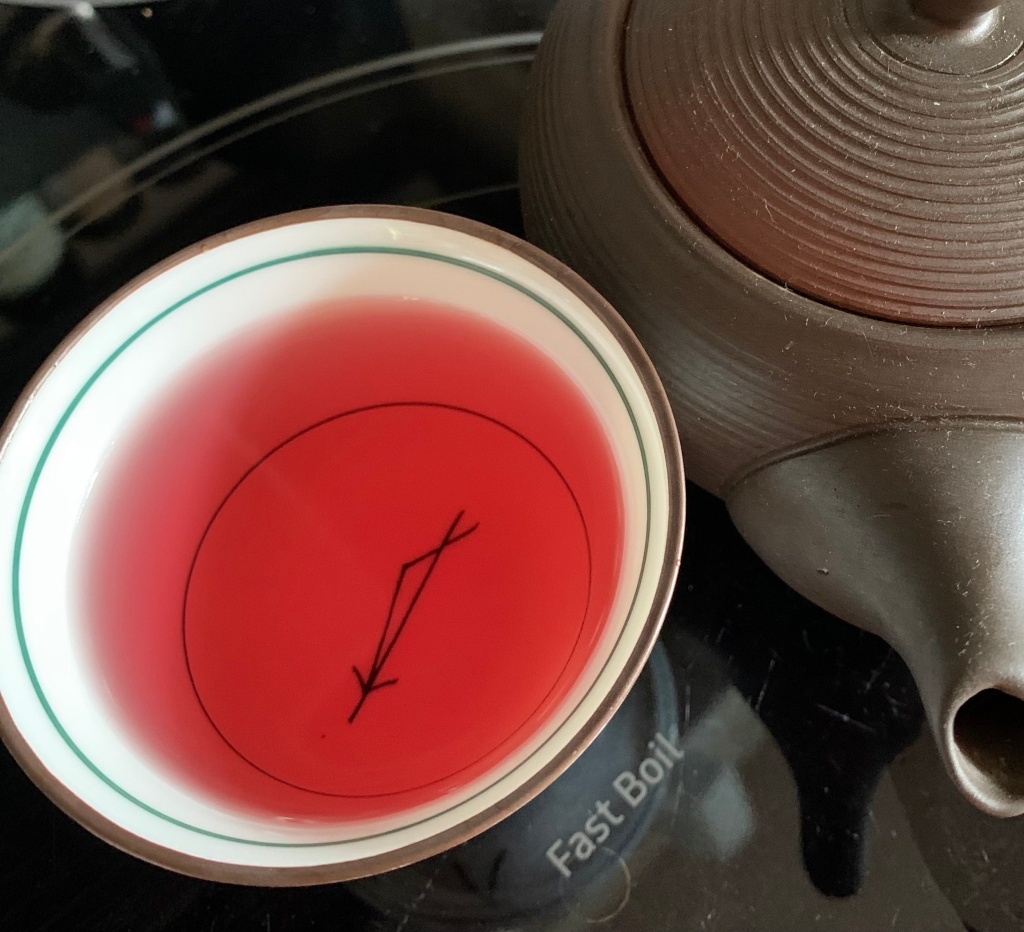
I’ve purchased hibiscus tea, which is red, and comes from this plant – I assume. It is different from a normal hibiscus, which you do not consume.
As soon as I saw my first Roselle flower, I thought of the okra I grew last year. The biggest difference is that roselle is pink and okra is off-white. Otherwise, the flowers are very similar. This year I have one Roselle planted next to a row of okra (which is growing from my saved seeds).
Roselle and okra plants
From everything I’ve seen, the red calyces are supposed to show up in Fall. Mine have begun to show up in April and May. Even Elyse, of The Urban Harvest, says that the flowers won’t show up until Fall… and she mentions drying the petals (?) to store and use the remainder of the year. The advice is part of this wonderful, and informative new video from The Urban Harvest and includes more veggies that can be planted in May here in Florida.
How to Use the Roselle Hibiscus For Food
I had no idea what to do with this collection of red pods. After watching a few videos, I came across this video that depicts three ways of using the calyces. (I’m still not exactly sure of the correct spelling – is it with a c or an x?)
Watch the video, which shows how to peel off the petals, rinse and preserve the edible parts. They can be frozen, dried, or cooked. I plan to eventually try all of these suggestions. But first, I used the petals (about 5 pieces) to make some tea!
I’ve had very good luck growing the Roselle hibiscus. My seedlings were having issues, so maybe just plant the seeds right in the ground to begin with, or start them later in the season in pots.
Once the seedlings were in the ground, they took off. Shortly afterward, they began to flower. I’d never grown them before, but the flowering means the red pods are coming next.
It is not necessary to prune the plants to make them bush out. Mine are doing that on their own. I think the two shown below will need more space and I might have to re-plant.
Roselle growingMay
If you live in Florida, look into growing this plant. It loves the heat and you can make tea from the flower pods (at the very least). Look up the health benefits of drinking hibiscus tea, or using this plant for health. I have found lots of pages online with information.
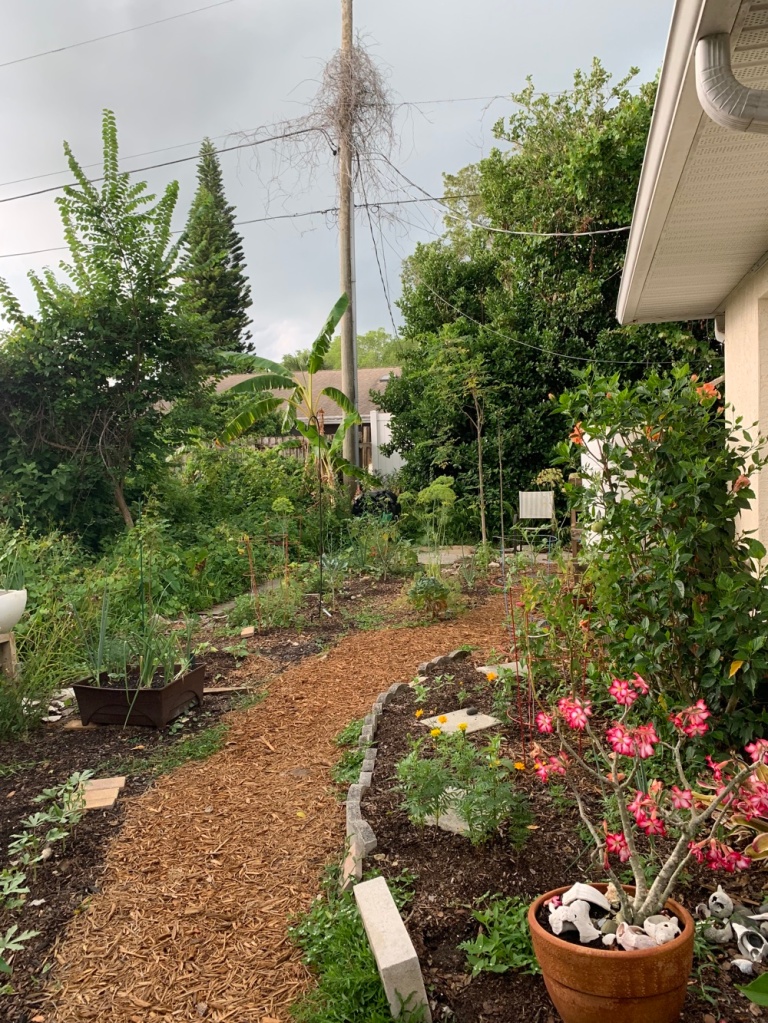
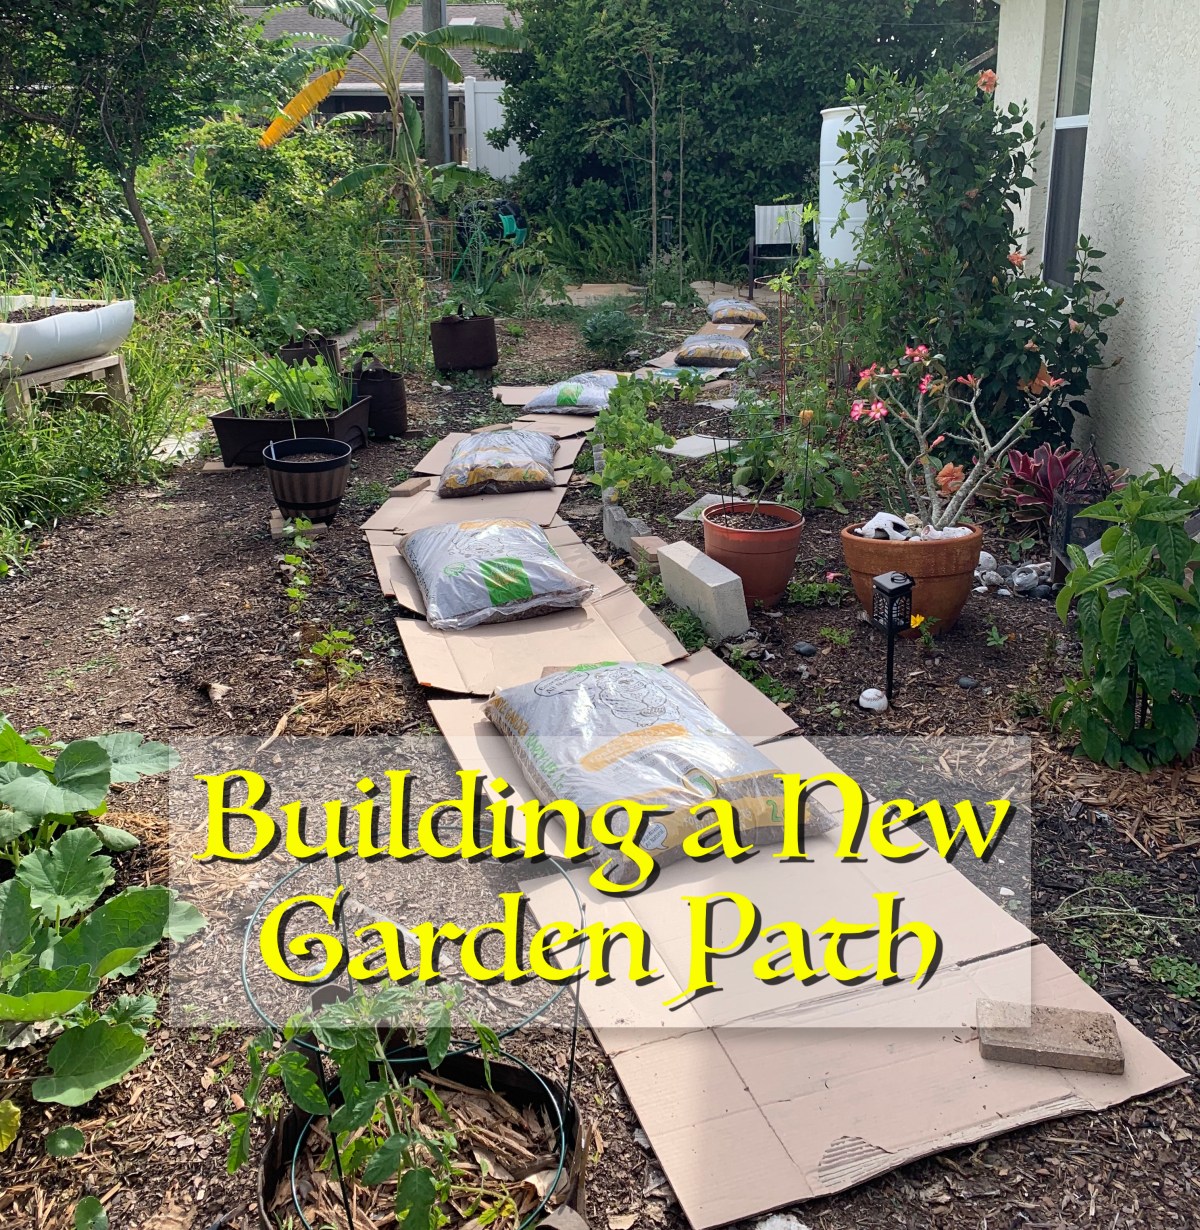
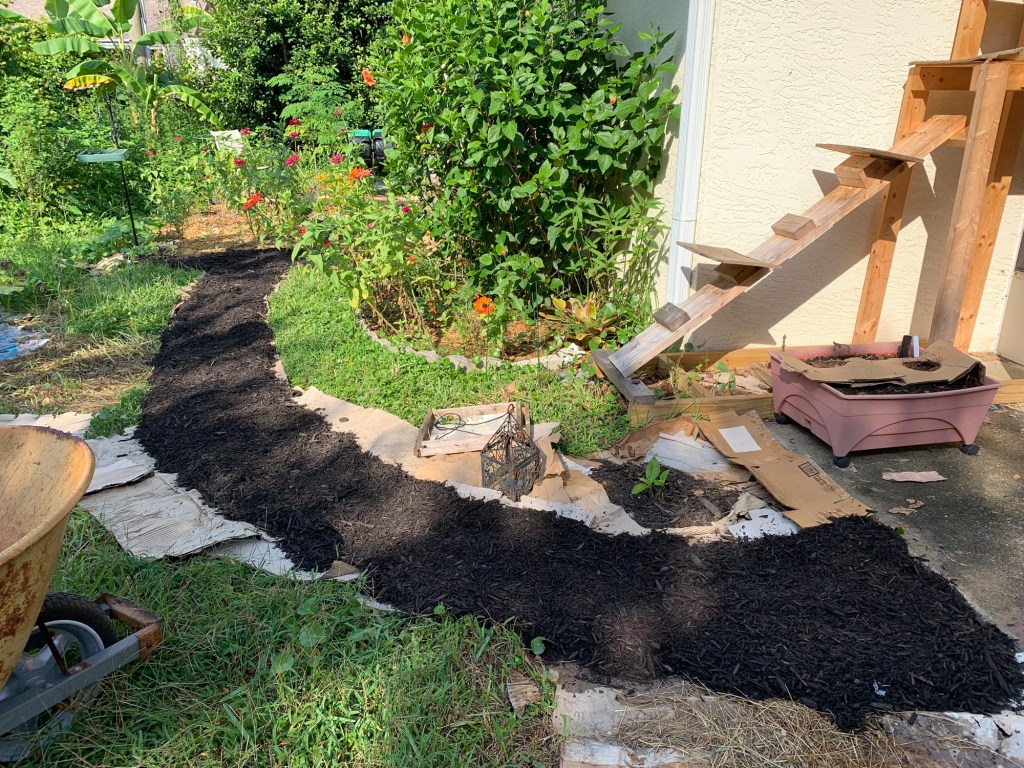
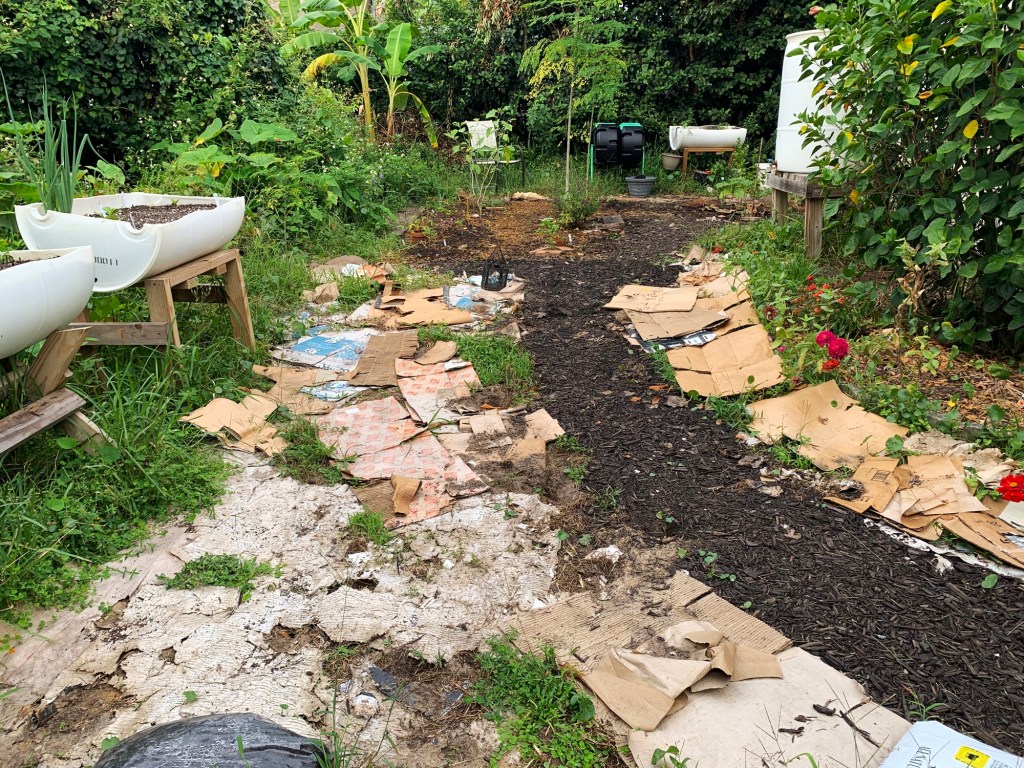
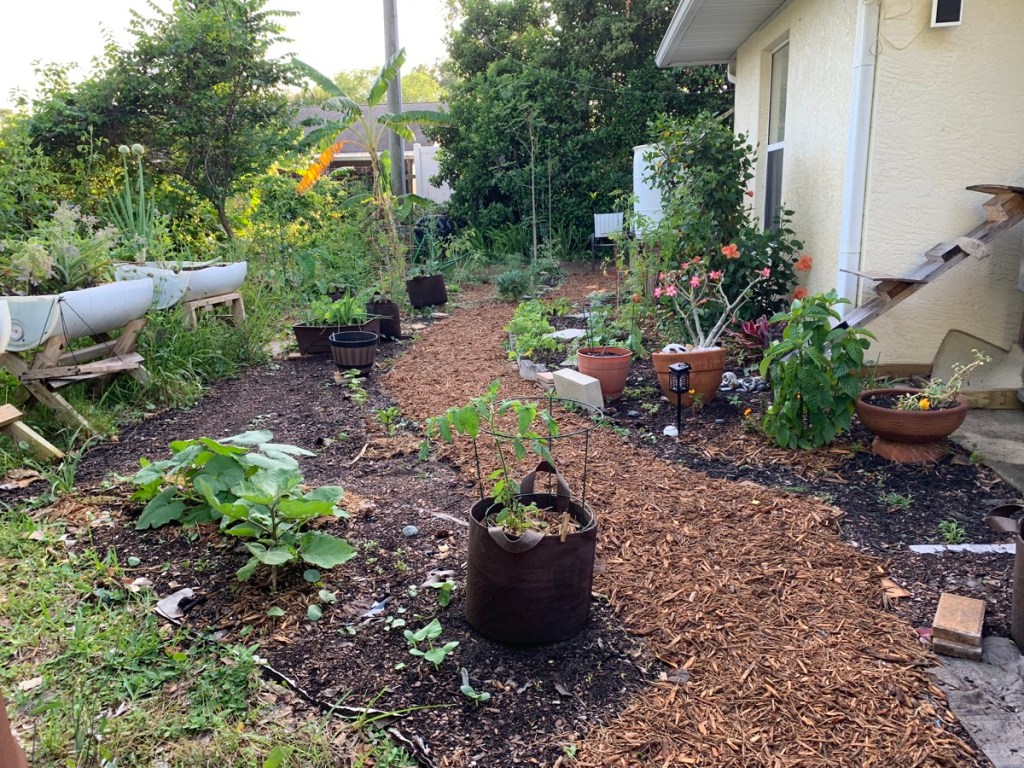
The past winter and spring months have kept me busy in the garden. The planing, planting, weeding, and watering has been a first priority and I’ve neglected the walkways. Also, I still don’t have my own vehicle and must depend on getting rides to the yard shop. Between all that and the weather, I’ve put off buying the items needed to build my new garden path.
Yard 2023 – grassold dark mulch walkwayCardboard down to kill grass
Even though I had put cardboard and mulch down about a year ago, the mulch has broken down and the weeds are coming through. A new path is a good reminder of where to walk too! I know where my veggies are planted, but other people don’t, and if they venture into my yard, they could crush little growth that is difficult to see.
Cardboard and Mulch
Saving cardboard boxes is a regular pastime at my house. I stack them up on the porch, along with shipping paper that comes in boxes. Anything that I won’t use gets burned in the burn barrel, or put out for recycling. The cardboard collection is large, so I had no trouble filling up the walkway.
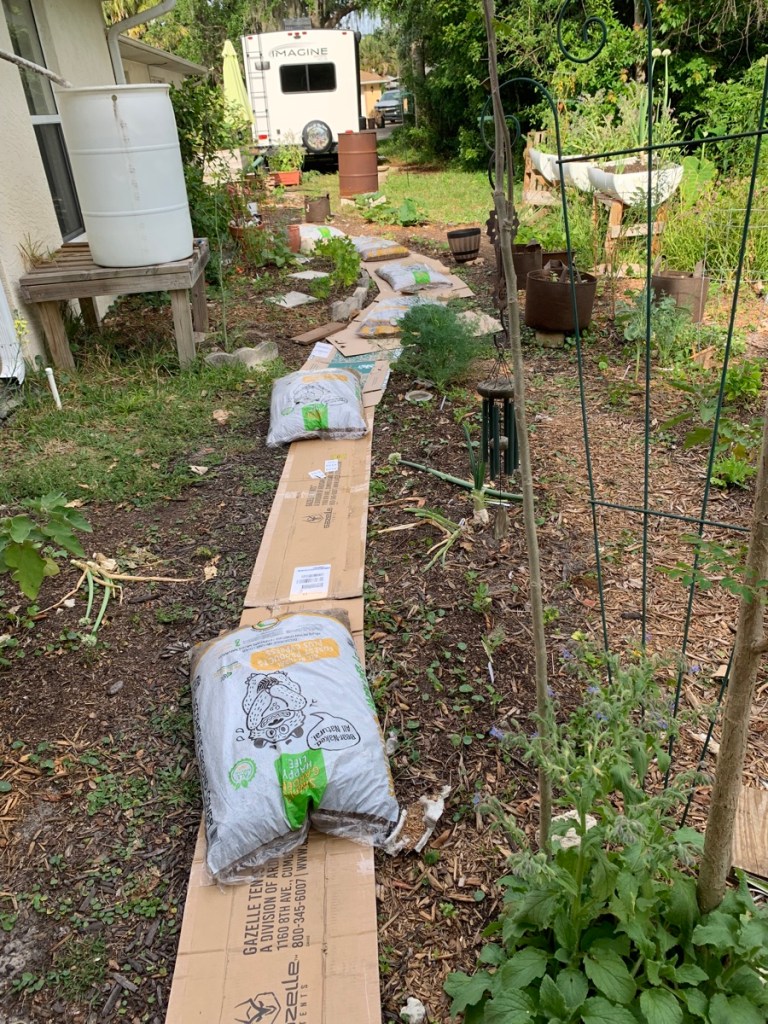
I had to have the mulch bags to hold the cardboard in place so the wind wouldn’t blow it around.
back to frontfront to backMulch path2024 – New garden path!
My son drove me to the Yard Shop to pick up some bags of mulch, and I was in business.
I’m an older lady and know my limitations when it comes to yard work. So the first day I put out the cardboard and set the bags of mulch on top. Thankfully the mulch was dry and the bags were easy enough for me to move.
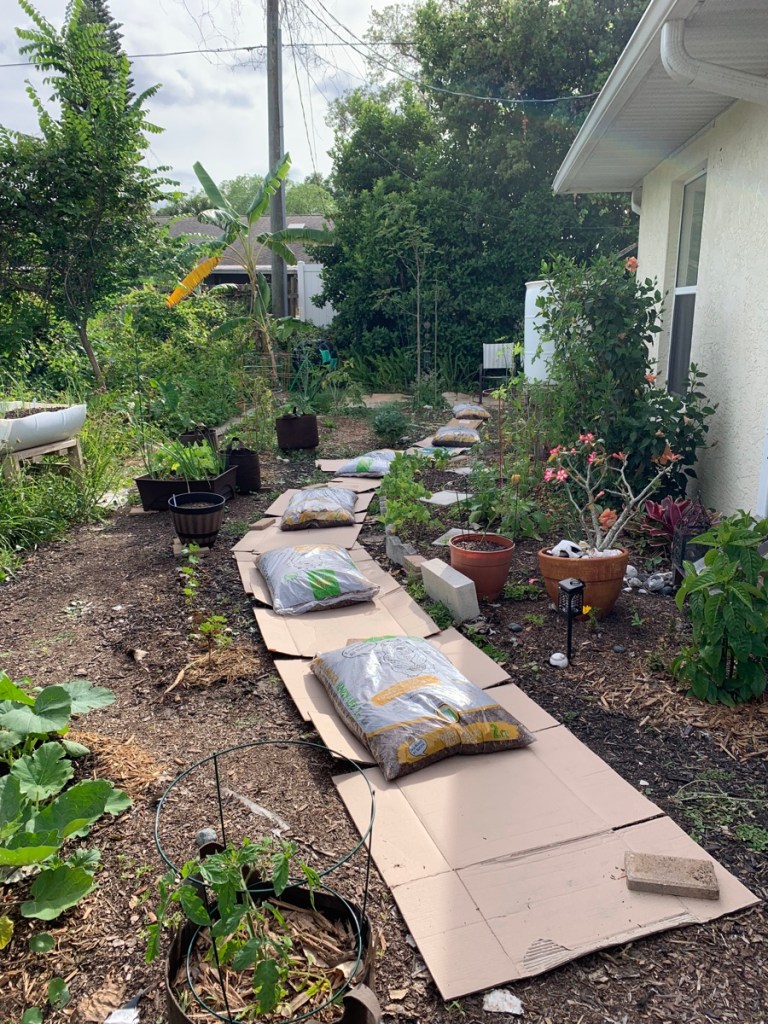
The following day, I opened up the bags and spread them over the cardboard, adding more cardboard in places that needed filling in.
And there it was – my new garden path!
I’d like some flagstones, or slate pieces, to put on top of the mulch. Maybe I will pick some up at some point.
We also picked up a few bags of mushroom compost and potting soil, which I am mixing up 50/50 in the wheelbarrow and putting around the plants that are currently growing.
Our weather here on the east coast of Florida has been beautiful and fairly cool for about a week now. Have to get this stuff done while we can. Oh, and I just ordered a collection of veggie seeds for the year… will be writing about that soon.
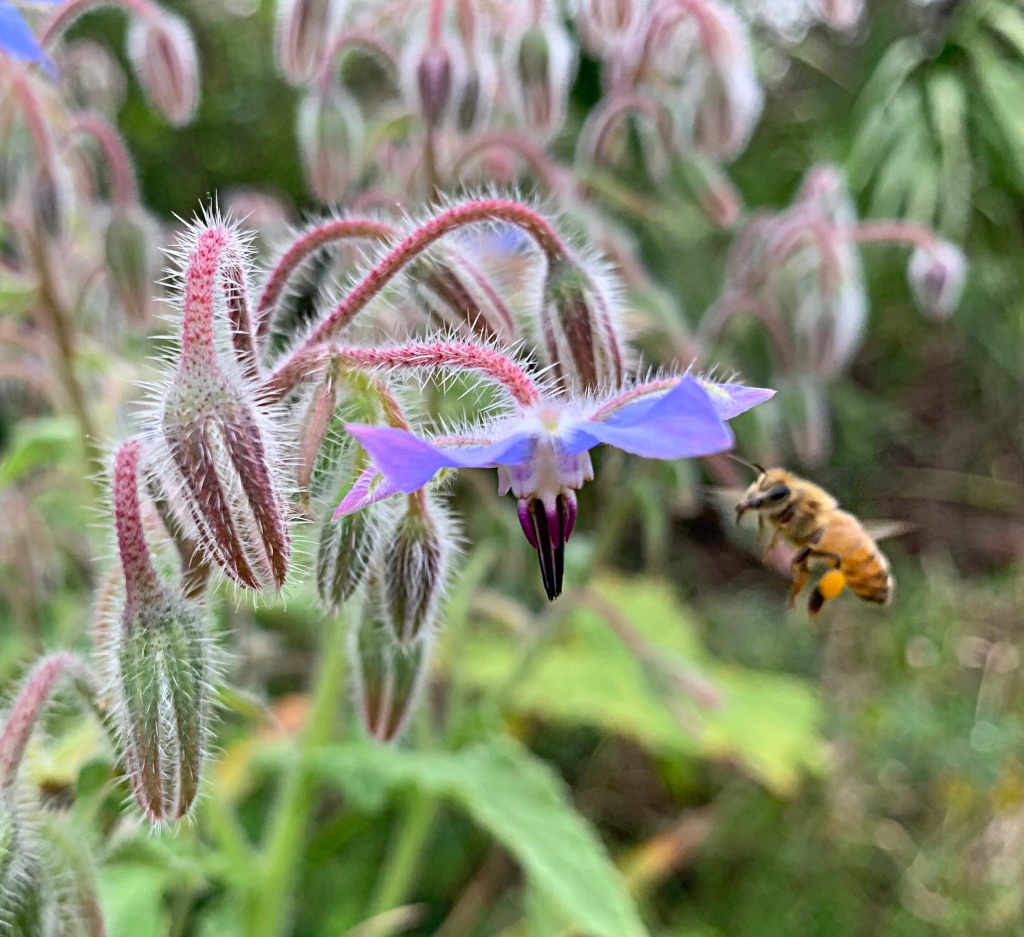
Florida gardeners can easily grow borage. The blue flowers add interest to any garden, and honey bees love them. The plant is short lived as it dislikes the heat.
I cooked a garden vegetable soup the other day (with some beef) and wanted to share the informal recipe here. Make it vegetarian too. My garden has beets, carrots and…
Making a nutritional and good tasting soup is such an achievement. Homemade goodness can’t be beat. I have a few tips for making sure the flavor and consistency is there.