New England native, Florida resident. Blogging about boating, beach-combing, gardening, camping, and knitting. Work for Zazzle as a designer since 2008.
I’ve been having a blossom end rot problem with my Summer Squash. After reading a bit about the disease, I found a couple of solutions to try.
Vegetables will begin to grow and look fine, but then the ends will turn brown and rot the fruit like in my image below.
First, overwatering is a concern. Because it tends to be very hot here, I do water my garden every morning. Plants in pots outdoors, like my Persian Lime Tree, need lots of water.
The problem with too much water on the yellow squash, or zucchini which is similar, is that calcium leaches out of the soil and the plant can’t get enough to grow the squash correctly.
So adding calcium can help. I decided to try adding eggshells, but store bought organic calcium may be the better way to go. It’s not cheap, but this problem can affect many types of vegetables so the bag would probably come in handy.
Squash blossom end rot
I have read that one way to add calcium to garden dirt is by adding crushed, dried eggshells.
A mortar and pestle can be used to crush the shells to make a fine powder. This can be added to the soil. However, I also found this page at the Garden Myths site which claims that eggshells basically do very little to enhance soil. They say that grinding the shells to powder and adding to acidic soil is your best shot for this idea to work. They claim that eggshells remain intact for long periods of time and do not break down to add nutrients to the soil.
Egg shells
Crushing dried egg shells to add calcium to the garden
In the end, what the suffering plants probably need is additional calcium (in whatever form you choose to use) and possibly less water. Read more about Blossom End Rot at the Gardeners site.
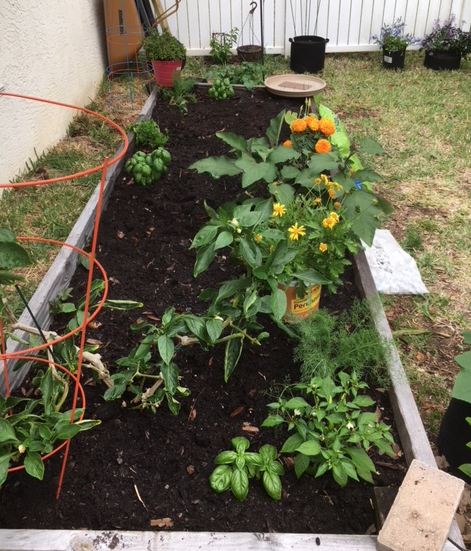
May is here and my backyard vegetable garden is off to an okay start. I’m still getting used to growing veggies in this climate, but I’m happy to have big, luscious green peppers to use already!
My garden area is very small and the plants are divided between a raised bed, fabric bags, and an old grow box. All my Florida gardening is still in the experimental stages! I’m learning, but at least I have the raised bed filled with good dirt.
The backyard garden in May
This pepper plant has been around since last Spring! This amazes me. I always thought pepper plants liked the warmth, but this one survived winter. And, yes, it’s Florida, so “winter” is a dirty word here, but the temperatures were truly cold for a few days. I assumed the pepper plant would die, but it did not.
And once Spring arrived (February… hahaha) buds appeared and the peppers began to grow. I was picking them by April.
Picking green peppers this year by April
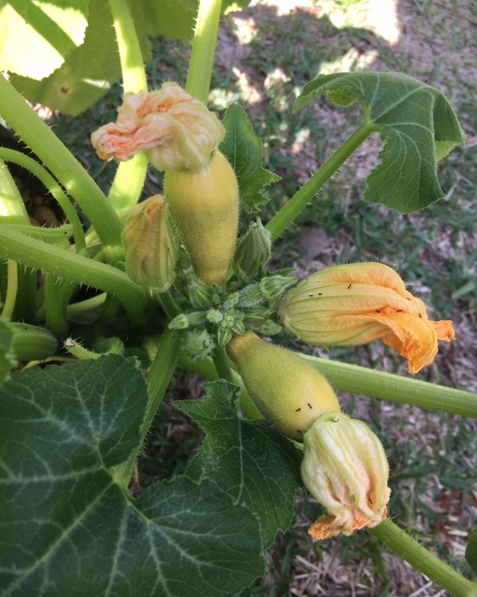
The yellow / summer squash is something that I am having trouble with. The plants (from seeds) grew nicely and then flowered and grew little squash. But then they began to pucker up and rot on the ends.
This can be caused by too much water, so I have been watering them less. Also I added some ground egg shells to the dirt because I read that a lack of calcium can be the culprit for blossom end rot.
I’ve picked two small squash so far and have had to throw many rotten ones away. The ones I ate were delicious!!! So I am hoping for more. Last year I tried to grow them also and had bugs and mold take over before I got squash to eat.
Yellow Squash
The cucumbers have just started to take off. Some are growing in fabric garden bags, and a few are planted at the edges of the raised bed.
I’m hoping for cukes to eat soon, but I’ve also read that the raccoons don’t like the feel of the fuzzy stems on cucumbers. If I have strands of cucumber vines all around my garden, will the raccoons leave my vegetables alone? Please work……
Cukes in fabric bag and inside bed
For the heck of it I threw a couple pieces of old sweet potato into my mostly empty garden back in February (?). Now the vines are long and pretty. When they start to die I will dig down and see if I find potatoes. I’ve grown regular potatoes, but never sweet potatoes.
Sweet potato vines and leaves
My little red pepper plant is growing lots of peppers and I’ve already used a couple red ones. They are very hot. I really wanted jalapeños but there were no plants when I was shopping. I dislike having to buy all my plants at the Home Depot, but there are no farm stands around.
Chili red hot peppers
I found a couple of parsley worms on my fennel. Dill plants were nowhere to be found, so I settled for fennel, which I have never grown. Ladybugs and apparently parsley worms enjoy it and I’ve been chopping it up to add to food I cook.
Parsley worm on fennel
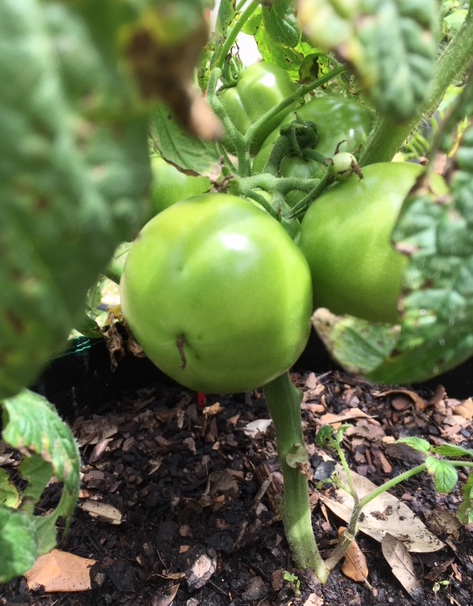
One tomato plant has 8 green tomatoes and the other has 6. I’m counting them to make sure the raccoons are not stealing any during the night. I’ll bring the plants inside if raccoons begin bothering them.
Tomatoes are coming along
My little Navel orange tree lost a lot of it’s small fruit, but a few oranges are still growing.
A few oranges are growing on the new Navel Orange tree
The eggplant is still not giving me any eggplants, but it’s a good home for ladybugs. I’ve seen them in many forms (eggs, larvae, and beetle) crawling on the leaves. The aphid problem is no longer a problem. I can’t find a single aphid on anything! Don’t you love those ladybugs?
The weather will continue to get hotter and I may have to stop gardening within a month or so. I’ll see what lives and what doesn’t and go from there.
When shopping for food I always look for the USDA organic seal, like the one on this package of carrot seeds. Food, and products like seeds used to grow food, will contain the green organic label, but the fertilizer used to grow them will not.
Apparently garden fertilizer and bags of soil require different symbols to identify which are truly organic. The word “organic” alone means nothing when it comes to buying products you need to grow your own food.
It seems odd to me that we can easily pick up USDA certified seeds to plant, but it is not nearly as simple to find certified organic soil and fertilizer used to grow them.
Why The Word “Organic” is Not Enough
As I was writing a previous post about building up the dirt in my raised bed, I went looking at my bags of fertilizer. Sometimes I link to products I have bought in case readers are looking for the same type of thing. The one I checked was my bag of Milorganite.
DO NOT BUY MILORGANITE, especially if you are an organic gardener! And personally I will never go near the stuff again. Once you look closely at the bag you may feel the same way.
Says “organic” but this is deceiving
Milorganite is not truly organic in fact it contains a “warning” on the back.
Although this bag (my photos) contains the wording “organic nitrogen” (at the top on the front) and “eco friendly” (little yellow sign), when you look at the bottom of the back there is a “warning” sign (that exclamation point). Most of the labeling on the back of the bag is a bit scary. Such warnings are: Do not breath it in, wash immediately after touching, and do not apply before a heavy rain or near water drains. Yikes… I didn’t want this stuff anywhere near my vegetable garden, or in my yard for that matter!
So why did I buy this stuff in the first place? For one thing the word “organic” at the top fooled me. Apparently only the nitrogen is organic. I really have no idea what that means, but the product is only 5% nitrogen. The packaging is enticing with all their good wording choices and big photos. Someone knows how to market.
But, once I looked closer at the bag, I thought something was wrong. Organic is good and natural, so why a warning? Because companies can use good-looking wording like “organic” and “natural” and “eco friendly” which all may mean nothing.
This got me wondering (and worrying) about the other organic-labeled products I have been using in my yard. Are they really organic?
Inspecting Labels on My Purchased “Organic” Products
Here’s what I found when I looked at the products I use in my garden. From the soil we choose, to the fertilizers and amendments, everything must be truly organic if we want our vegetables and fruits to be organic.
So I inspected my bags further, looking for the symbols telling me that my products were truly considered okay for organic gardening.
Dr. Earth and Miracle-Gro Pass the Organic Labeling Test
Fortunately the soil and fertilizer I have been using are real organic products.
YES! The Dr. Earth fertilizer contains three seals. One is OMRI Listed, and the other two are CDFA and MycoApply. Those two are so tiny I could barely read them, but they mean good stuff. Unfortunately not enough people understand these terms. OMRI (Organic Materials Review Institute) is the big one to look for. OMRI is a place where products must be certified useable in organic gardening. Once a product is approved, they can use the OMRI seal. This is what we have to look for when choosing fertilizers, soil, and amendments for the yard and garden.
Dr. Earth fertilizer has OMRI and other certified organic symbols
Dr. Earth with OMRI, MycoApply, and CDFA seals
The Dr. Earth website explains what the CDFA and MycoApply labels mean on their products. The company is working to create good fertilizers which help the earth. I was impressed with the earth-friendly info at their site. No phony advertising here.
YES! Recently I bought eight bags of Nature’s Care (by Miracle Gro) garden soil ($7.97 a bag at Home Depot) and was pleased to see the OMRI label at the bottom of the bags. I also use their bone meal which has the same label.
Also the Miracle-Gro Organic Choice Blood Meal (shown in my photo, but used up before I checked the packaging) is listed as organic at the OMRI site. Use the site to search for products you have or plan to buy.
Look for the OMRI symbol
Down in the corner find the OMRI listed symbol
Yes, Organic Soil
OMRI Label in lower corner
The OMRI site explains (read the “what is organic?” section) that the word “organic” is not regulated for fertilizer and non-food items. This allows companies to use the word when it is not necessarily true. As I mentioned above, why? Does this make sense to anyone?
Although I will now read labels and look first for that OMRI seal, as the writer the Organic It’s Worth It site mentioned, other wording can take the place of that seal. I suppose not every truly organic company contains the seal of approval – I don’t know. Be sure to look for certain wording on the labels of products. If the company claims that the product “meets the requirements for organic production” the product should be fine.
For this reason, I suggest shopping local for such products. Label reading is easier than buying online. At Amazon, when I searched for OMRI certified fertilizer I only found a few with the label. Even though I may link to products on the Amazon site, I would rather check locally for these types of products. Often local shops will sell for less. Also, you can more easily read labels and purchase exactly what you see.
If you choose to buy online, here are some OMRI listed organic fertilizers found at Amazon:
Building a garden is slow and steady work, but once the ground is prepared, the fun begins. This may take days, weeks, months or years depending on the size of the garden and how much help you have in doing it. Cats not included.
As a new gardener you may think that growing things is pretty straightforward. Buy the plants, dig a hole and put them in the ground. A little water here and there and soon you’ll see flowers or vegetables emerge.
Experienced gardeners know it is far from being that simple.
A Little Back Story
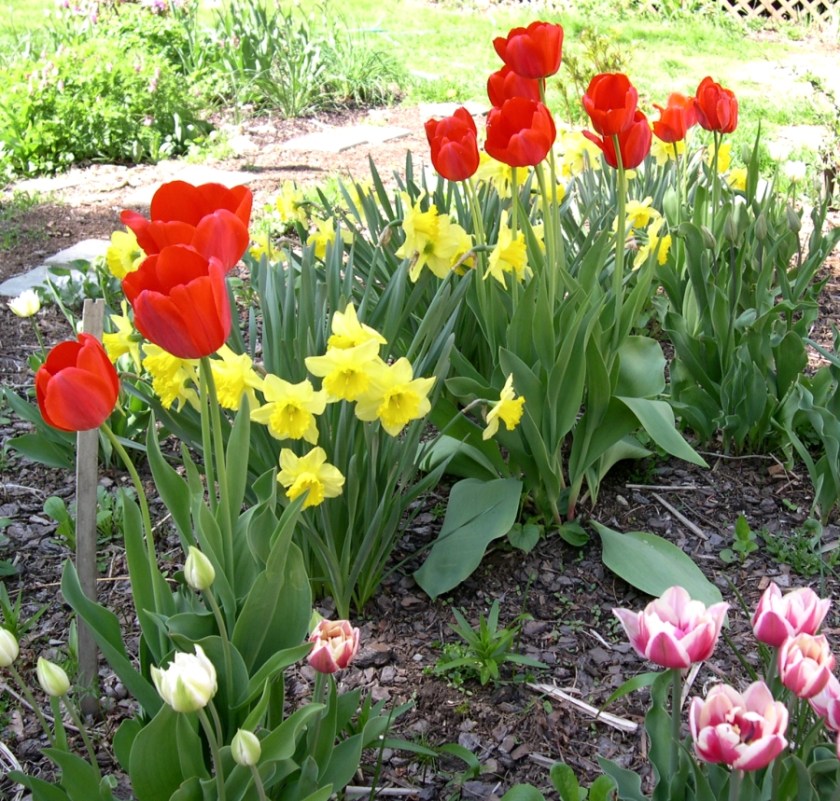
The first house I bought in New Hampshire had ready-made, lovely garden areas. I enjoyed picking asparagus from the perennial asparagus bed. Stunning tulips popped up in Springtime all over the yard, and the large perennials included wisteria, dogwood, and hydrangea trees! I enjoyed that yard for only two years, then moved on, through no fault of my own.
My old New Hampshire Garden in Spring
The nice thing was the fact that the gardens were ready for planting. I could go buy pretty plants, or vegetables and put them into the ground and they grew nicely alongside already established additions. Prepared beds and established perennials are a wonderful treat for a homeowner.
After that, I have never lived in a ready-made gardening landscape. This means planning the site, tilling the soil, adding amendments, and finally buying the plants which will hopefully grow happily in their designated spots.
Without the extra finances (or help in the yard) to put toward all this, it can take years to accomplish a garden plan. Really.
In New Hampshire I had loam delivered each year. I moved wheelbarrows full of the dirt to various areas in my yard over the course of weeks. I’m an older lady and can’t do a lot in any one day, so I had to pace myself. Within five years time I had some pretty nice gardens in my yard – then I moved away.
The Here and Now
I moved into my Florida home in Fall 2016. My son built me a raised bed and I’ve been working on filling it since then. At the time this writing it is April 2018 and finally the bed is full of good soil which is ready for planting.
The raised bed is ready for planting
I’ve been using the raised bed as a mixing station. One end is free of plantings so I can dump bags of dirt and compost in and mix it up. After adding blood meal, bone meal, and fertilizer, I mix it up like a big stew and fill black pots to grow individual plants. (By the way, as I was writing this, I discovered that not all “organic” labeled fertilizer is really organic. Read my post about identifying real organic fertilizer and even bags of dirt.)
I also had to re-plant a big bucket in the yard where everything froze over the winter. This pot used to hold a huge croton. Now you can see what’s left in the background.
Big pot re-planted with crotons and flowering plants
Now that I’ve used that good dirt mix everywhere it was needed, I will plant more vegetables in the raised bed. From here on out, all that is needed is to amend the dirt with compost every so often and re-plant when needed. The hard work is complete.
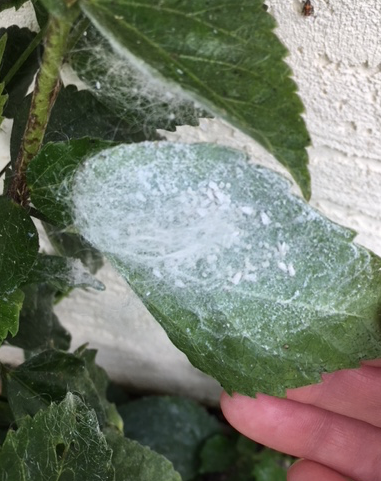
Found fuzzy white infestation of aphids and white flies on my hibiscus plant.
After writing a recent post about finding aphids on my pepper plant, I realized that I need to be vigilant about accidentally removing ladybug larvae and eggs. One plant that is sure to have aphids in the hibiscus. It is not unusual to find them all over the buds and new growth.
I haven’t paid much attention to my orange hibiscus plant over the winter, and imagine my surprise (and disgust) to find not only aphids, but long, white fur on the leaves! I don’t know what else to call it, but fur. It’s long enough to blow in the breeze and is attached to the underside of some of the leaves.
Beneath all that “fur” is a colony whitefly eggs and nymphs. How do I know this? I finally found a super helpful page at Hidden Valley Hibiscus, which talks about this exact type of manifestation, which comes from a southern whitefly called the “Giant Whitefly“. Here is how they describe the fur, “After hatching, the nymphs produce long, hairlike filaments of wax up to 2 inches long that give a bearded appearance to affected leaves.” Exactly, little white beards attached to sticky leaves.
It was not easy to get these photos. Any time I touched a leaf with white, little moths or something flew off. Also the leaves were very sticky. It was pretty gross.
This will never happen to your hibiscus if you are vigilant about checking for unwanted bugs. Whiteflies can be sprayed off with water, just like aphids.
The majority of the white fur was on the stems at the back of the plant. A secluded, less windy spot seems to be the preference for this type of infestation.
I plan to cut off the nasty stems from the back of the plant, and maybe spray off the rest. But I will keep an eye on all that ladybug larvae because I don’t want to disturb them.
Ladybugs are wonderful to have, but they need something to feed on. Somehow they know when to show up to kill an invasion of the bad guys.
The underside of the leaves have white spiraling lines, which is from the adult whiteflies.
I found lady bug larvae on the same leaf as the white fuzz. I had to trim up the hibiscus plant and spray it a few times with the hose to reduce the white fly population. I’m still seeing lots of ladybugs (in many forms) on the plant.
Fuzzy white aphids and lady bug larvae
Hibiscus plants are very hardy. They can be cut way back, trimmed and left without water and still grow fine. I made the mistake of planting this little shrub too close to the house. The stems in back don’t get enough air circulation and hence the problem.
Ladybugs will eat aphids, but ladybugs appear in various forms. Know the larvae stage and let it live to eat those aphids.
Not only are ladybugs cute, but they are beneficial to gardeners. Often gardeners wonder how to bring ladybugs to the yard? The simple answer is to hope for garden problems in the form of pests that feel ladybugs.
Ladybugs, or lady beetles as they are sometimes called, are helpful in vegetable and flower gardens mainly because they love to eat aphids and other garden pests. Aphids are one of the worst pests gardeners deal with. When aphids begin to show up on leaves, flowers and buds, they ring the dinner bell for ladybugs.
Unfortunately as gardeners, we have to have unwanted bugs in order to get these beneficials to the yard. It makes sense. Ladybugs (and other beneficial insects) go where the food is.